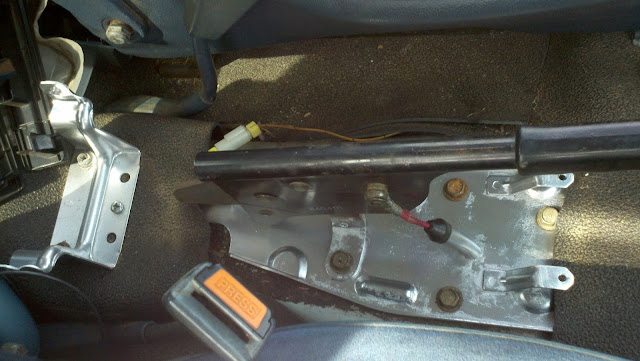
Ok, so that's pretty disgusting, but the cable appears to be in good enough shape on the handle and is attached, so under the truck we go.
Ok, well that's connected, but as you can see the coating as come off and the cables are a little frayed around the entrance to the thicker coating. Potential problem point #1.
Ok that.... doesn't look good at all. How did that even happen? Why? What is even? Definitely problem point #2. Upon finding this I was still hopeful I could salvage the cable, because even though the coating had been removed and it was all rusty looking, the actual cable itself still seemed to be intact.
Well the rear section of the cable looks fine, so that's a plus.
Ok, so that's the first thing I'm going to address. I don't know if the pins just rusted out, or maybe the previous owner disconnected it for some reason? Who knows. I grabbed a set of calipers and measured the ID of the hole on the brake and the bracket, then went to Lowes to snag some bolts. Brought the bolts home and did a test fit (perfect :D!). I could get the right wheel connected, but the left wouldn't reach. As you can see in the top picture, it was pretty far away from the brake actuator deal. I started looking down the cable to see where it was locked up. Turns out that potential problem #1 was the demise of the cable. The cable would move past the janky part where the coating was cut, but that little bit where it was frayed prevented the cable from moving. Since the cable was rough looking anyway, I didn't feel like it would be safe to try removing the cable and soaking it in rust eliminator to salvage. For $60 I'll get a new cable and some peace of mind.
Got on Amazon and found the proper cable (thanks to the guys at InfamousNissan). Removing the busted cable was a pain. Several bolts were frozen in place, requiring an overnight soak in WD-40 and a set of vice grips to remove. Needless to say, I was not going to be reusing those bolts. I put them in a bag so I could get some replacements later. I also had to remove the skid plate that protects the gas tank. While doing this I managed to shear one of the bolt heads right off -_- Alright, so there's something else I get to do... drill out that bolt, perhaps cut the nut off the other side, then get a new bolt and/or nut to replace it.
Anyway, Amazon accidentally next day air instead of 2 day, so I got the cable the next day and began the install. I yanked the old cable as well as the e-brake handle and plate. I had to use a hammer and chisel to get whatever that hairy crap was off the e-brake handle/plate, then sanded it and sprayed it with some Krylon rust eliminator paint.
I could have done the bolts too, but it's going to be under the console and I wasn't that worried about it. Looks about 500x better than the atrocity that was under there previously. While the paint was drying on that (before installing) I went ahead and installed the brake cable.
I used the bolts that I bought for the previous cable and did a successful test fit. The truck is now stopped on it's own without the assistance of chocks :D
Epic victory.
I actually did the e-brake after yanking the dash (while I was waiting to determine the proper cable to purchase), but wanted to keep this as orderly as I could. Anyway, lets pull the dash and see what we can see about the air conditioning.
The garage would be the dashboard's home for the next 6 weeks. It's actually still sitting there right now. If you notice, basically all the metal behind the dashboard is rusted pretty bad. While I had everything apart, I figured I might as well fix that. Evaporust FTW!
That's what I used on the e-brake stuff as well. It's awesome.
Oh hai nasty rusty metal thing.
Bam, that's what I'm talking about. Did I mention how awesome Evaporust is?
Soaking the steering column support while paint is drying on a few other pieces.
While doing that I yanked all the AC duct work to thoroughly clean/disinfect (it had a bunch of dirt, hair, and mouse feces in it). While doing that I found the problem with the air conditioner. I made this short video to show to the guys at IN to help diagnose.
The problem resided in this piece.
Corn and a mouse dwelling also resided in this piece.
It just so happened that a couple days after getting it down to this point (and removing the corn/cleaning the dirt and whatnot off everything), a guy on IN was selling that whole piece. I bought the one from him and attached the corn piece from mine (they come apart) to it. Tested it out and it worked :D
With the newly fixed AC selector thing box in, I started rebuilding the AC duct work.
This post is already pretty long, so I think I'll stop here for the moment. More to come soon, I've still got a fairly good bit of progress to catch up on before getting to where I'm at now!


No comments:
Post a Comment