Tuesday, August 28, 2012

MOAR steering shenanigans

Moar updates on the steering situation. Most everything is done now :) but there's still some more left. Going ahead and posting this up to try to keep post length down.

SO... last we left off I had pulled the CV boots and ordered new axles.  Those came in late the next week, so off with the old and on with the new.  Yanking the axles wasn't too bad.  I did have to remove the front shocks though.  Basically stripped the front end down to where only the torsion rod and A arms were left.  I bought a pipe wrench to use to hold the axles while removing the bolts.  Being careful, I managed not to damage the axles any.  In about 20 minutes or so both old CVs were free.  I boxed the old CVs up thinking that I needed to turn them in to O'Reilleys (I had ordered repro axles) but I ended up getting new ones instead. I haven't heard many good things about the new axles, but this was a different brand and has a 3 year warranty so oh well.

A grand struggle was had to get to this point.


yummy
Picked up the new axles and put them on in the same manner, using the pipe wrench to keep them from moving.  Putting them back on took a little longer than removal, but that's pretty normal.
So clean...so shiny
After installing the axles, I had to get those spindles back on.  I installed the remaining upper/lower balljoints I hadn't done already.  After that I had the incredibly frustrating job of mounting the spindles back in the A arms.  I ended up having to jack the A arm up as high as possible without lifting the truck off the jack stands, then use one of those awesome ratchet strap deals to pull the upper and lower together enough to get the bolts in.  Before coming to this conclusion, dad and I tried everything in our power to hold the pieces together by hand or by using C clamps.  All of those attempts failed miserably.  I had completely forgot about buying that ratchet strap deal (I got it on sale over a year ago and never opened it).  After getting the strap it took about 45 mins/side to get the spindles installed.  Got those bolts all tightened up, installed the shield thing for the rotor, bearings, and hub/rotor itself.

Getting this far took entirely too long.

After getting all that crap done, I rebuilt the tie rods and installed those.  The tie rods weren't too bad, but it did take about an hour to finish them.  Getting the old ends off required me jumping up and down on a couple wrenches after soaking them in Liquid Wrench.  Installing the new ends was easy enough.

New rod ends make that center piece look like a dog turd.
Installed the tie rods, then the 4x4 hubs and calipers.  While installing the 4x4 hubs I noticed that the passenger side free running hub brake system was damaged.  After talking with the guys on Infamous Nissan I decided it would be best to replace this part.  I'm currently waiting to get a new one.  Hoping to have it next week.

Nissan Hardbody freerunning hub brake system: limited dildo edition
So I think this gets the blog up to date.  I'm trying to make it more picture heavy and less wordy, please leave feedback on what format you enjoy more.  Here's a couple pictures of what she looks like right now.  I REALLY want to have the truck drivable next week.  All that's really left to do to get her running after the 4x4 hub is bleeding/refilling the brakes.  Hoping my buddy Louis can come over and help with that on Thursday.  Once she's working I'll do some of the smaller stuff on the to-do-list post from earlier in the year.

This is the side with the jacked up 4x4 hub part (passenger)
The driver's side, all good except one bolt on the 4x4 hub that has a dirt dauber nest behind it

Friday, August 17, 2012

Steering shenanigans part 2

Continuing with the front end work, yanking the spindle was a royal PITA.  The left side upper balljoint was a horror.  I beat on it and beat on it to get it out of the A arm, but it didn't want to budge.

Photographic evidence of a ball joint being a douche bag.
I sprayed WD-40 on it and tried beating it to no avail.  Tried liquid wrench and moar beating and still nothing.  Sprayed it again with liquid wrench, then just moved around to the other side.  Took the bolts out that hold the ball joints in on that side and the spindle just came right out.  Would be nice if it's brother on the left side wouldn't be a jerk, but oh well.  After getting the left side I got ill and beat the right side with all my might.  Eventually the balljoint came loose.  A friend let me borrow his OTC front end kit so I could pop the ball joints out.

Tools and stuff. Srs bzns.


You know you're having fun when the 3lb hammer comes out.
I bought a OTC balljoint press so I could put the new ones in.  Installed the new ball joints in the spindles and installed the new rotors on the hubs.  Rebuilt the brake calipers with my buddy Louis (thanks again!).  Getting closer...

Look at it.
Time to do something about these CV axles... After much thought I decided I'd try to rebuild them, then was like j/k lol I'm just going to buy some rebuilt OEM ones from O'Reilleys.  

Looks tasty amirite?
I went ahead and yanked the boots just to see the condition they were in, and think it was a good idea to go ahead and replace them.


The new CV axles aren't in yet, probably be here next week.  I'm ready to get this thing drivable again...  Dad's getting ancy for me to get it out of the garage, and I'd like to have it running myself.  There's already been a few times it'd be nice to have a truck again.  Hope to have another update next week after the CVs come in.  Wanted to go ahead and get the progress so far just so the next post won't have to be horrid long.

Pile of old truck parts and the old header from the Yaris.

Wednesday, August 1, 2012

Steering shenanigans and other srs bzns

Yep, it's been almost 2 months since the last update.  I can barely even fathom how busy I've been.  Working 12+ hour days, weekends, etc. has just been seriously stepping in on truck time.  I've been able to work on it here and there, but it's been such small steps I felt it wasn't worth writing about.  Since the last update, the truck started making a weird noise coming from the front driver's side wheel.  Also, the brakes got squishy and the wheels would heat up shortly after driving.  Blarg.  Parked it for a while until I had time to meet up with some friends and see if we could figure out what's wrong.


My buddy Louis came over one evening and we drove it around for a while.  4x4 worked, truck seemed fine, then the noise came.  Louis thought it might be the 4x4 automatic hub derping, so we started taking it apart.


Examing the 4x4 hub parts

inside the 4x4 hub


So this was fun, but while we had it apart Louis noticed that basically all the ball joints needed to be rebuilt, and that both of my CV boots were proper jacked.  One had been gone for who knows how long, and the other recently burst.  Also the brakes were seized (which I had suspected due to the heat).  Began to suspect something may be wrong with the CV or bearings, but taking the hubs and all apart was going to take more time than we had, so we put it back together and it sat for a few weeks.


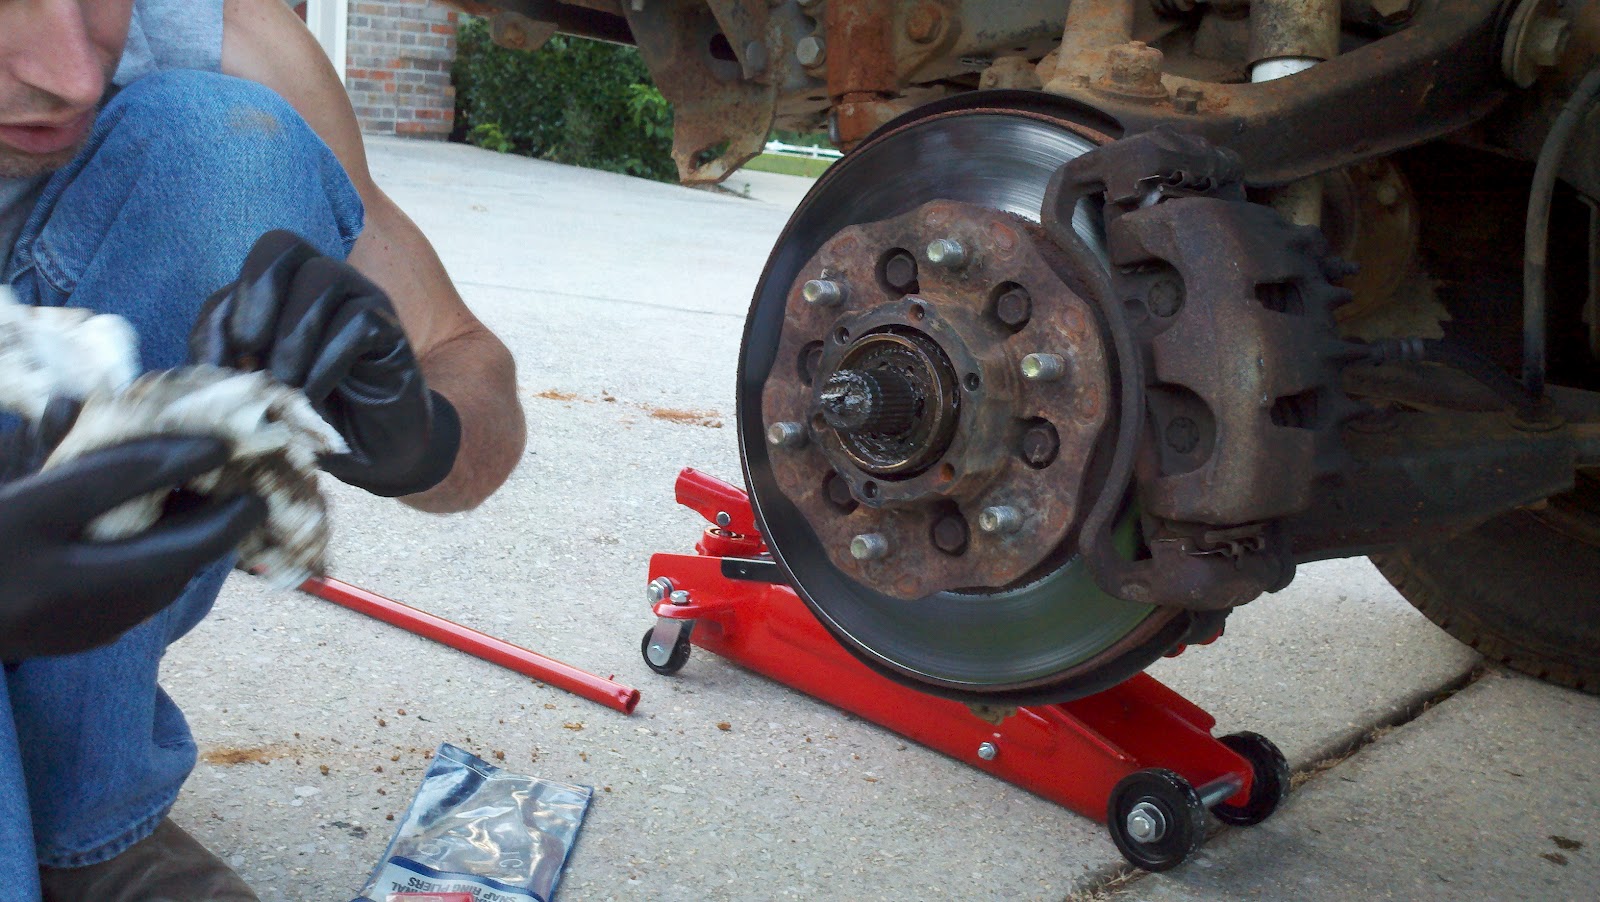
Later, I got permission from dad to park The Beast in the garage for prolonged work.  Popped off the wheels, 4x4 hubs, etc. and noticed the brake pistons were indeed stuck engaged.  We dinked around with these for a while, and eventually got them loose.  Purchased caliper rebuild kits.  The rotors were pretty worn and somewhat jacked up from the seized piston, so I went ahead and got new rotors as well.  Also bought all new ball joints.  All this stuff together was less than $150 :)  Getting the hubs and rotors separated was tough... took several minutes on each one with a 3lb hammer to get those things loose.  Also got the cotter pins out and the nuts off the ball joints of the steering arms on both sides. Going to have to find a ball joint press to rent/borrow to actually get the arms loose.


Truck's new home in the garage :) Note the Hayne's manual on the hood

Wheel hub and rotor off the spindle

Shiny new rotors

Rusty old calipers

Awesome jacked up rotors and pads
In the meantime, there was audio to be worked on.  I got a set of Infinity 6.5s to match the fronts.  The factory rear speakers have a nifty little blue housing around the grille, and I actually like the way they look, so I wanted to keep that as close as possible.  The rears apparently were blown out at some point, either way neither of them worked when I got the truck.  To keep the factory blue piece and whatnot required some serious Dremel work, a lot of patience, and even more time.  Here's what the factory speakers looked like.

Not bad by any means, but this one is pretty dirty. I liked the look and wanted to keep it pretty close to stock.  The Infinity speakers though, of course, have significantly larger magnets.  In fact, the magnets touched the back of the cab, so I had to make some plastic spacers to put in between the bracket that mounts to the cab and the cab wall itself, then put spacers between the speaker and the bracket, which were just thick enough for the blue trim to fit in between with some careful Dremel work.  Since this was the first run, I forgot to take pictures of what I did, but I'll definitely do that on the next go round.  I'm really happy with how it turned out.


The Infinity speaker definitely looks more legit.  Not very 80s, but they just sound awesome.  As I make the next one I'll take progress pictures.  It takes a lot of work, but I think it's worth it.  There's carpet against that cab wall too BTW, but I won't be putting that back up until the speaker work is done.


So yeah, right now The Beast doesn't move, but is getting closer and getting some much needed parts replacements anyway, so the next time it's up and running it should be better  to drive than before.