Tuesday, October 18, 2016

Bright on the inside dark on the out.

Since the last post there's been a fair bit of work to the old Beast.  Seems like I've spent a lot of time fixing things, so it was nice to get to spend some time making improvements instead of dealing with broken garbage.  The Beast turned 30 in May of this year, so I went out and bought a cookie cake to celebrate.  Me, the Beast, and the Yaris had a little party (I did give some of the cookie cake to my girlfriend but she wasn't in town at the time).  I'll go ahead and warn you, this post is going to be fairly picture-heavy.  I don't think anyone still has dial-up nowadays, but if you're on a limited data plan... just be warned.

30 years, 259k miles, and still going strong!


So to celebrate 30 years of being alive, I decided to give the old truck a few presents.  To start with, I decided it was time to finally get my map lights installed and to do something about that awful, horrible, smoke-stained, stanky-anus headliner.  I used the template David29 gave me with the map lights I bought to cut the headliner.  Then I had to yank the whole headliner out to actually install the mounting bracket, run the wiring, etc.

This was surprisingly difficult, the headliner is really thick

This piece of trim was not going to come off without breaking it :( You can see how nasty that headliner was here too.

After a lot of struggling with it, I ended up having to cut the headliner out.  You can see how absolutely horrifically dirty it was compared to the edges, which were under the trim pieces.

Roof was in really good shape. I decided to put some dynamat-like stuff up here to cut down on rain noise while I had the headliner out.
I bought some LED panels to upgrade the map lights and the dome light to LED festoons instead of the old "normal" bulbs.  They original bulbs worked but they were kinda dim and use a lot more energy than LEDs.  With the limited output on this truck's alternator, I'll save every miliamp I can for fun accessories. 


I had to do a fair bit of cutting/modifying to the dome light

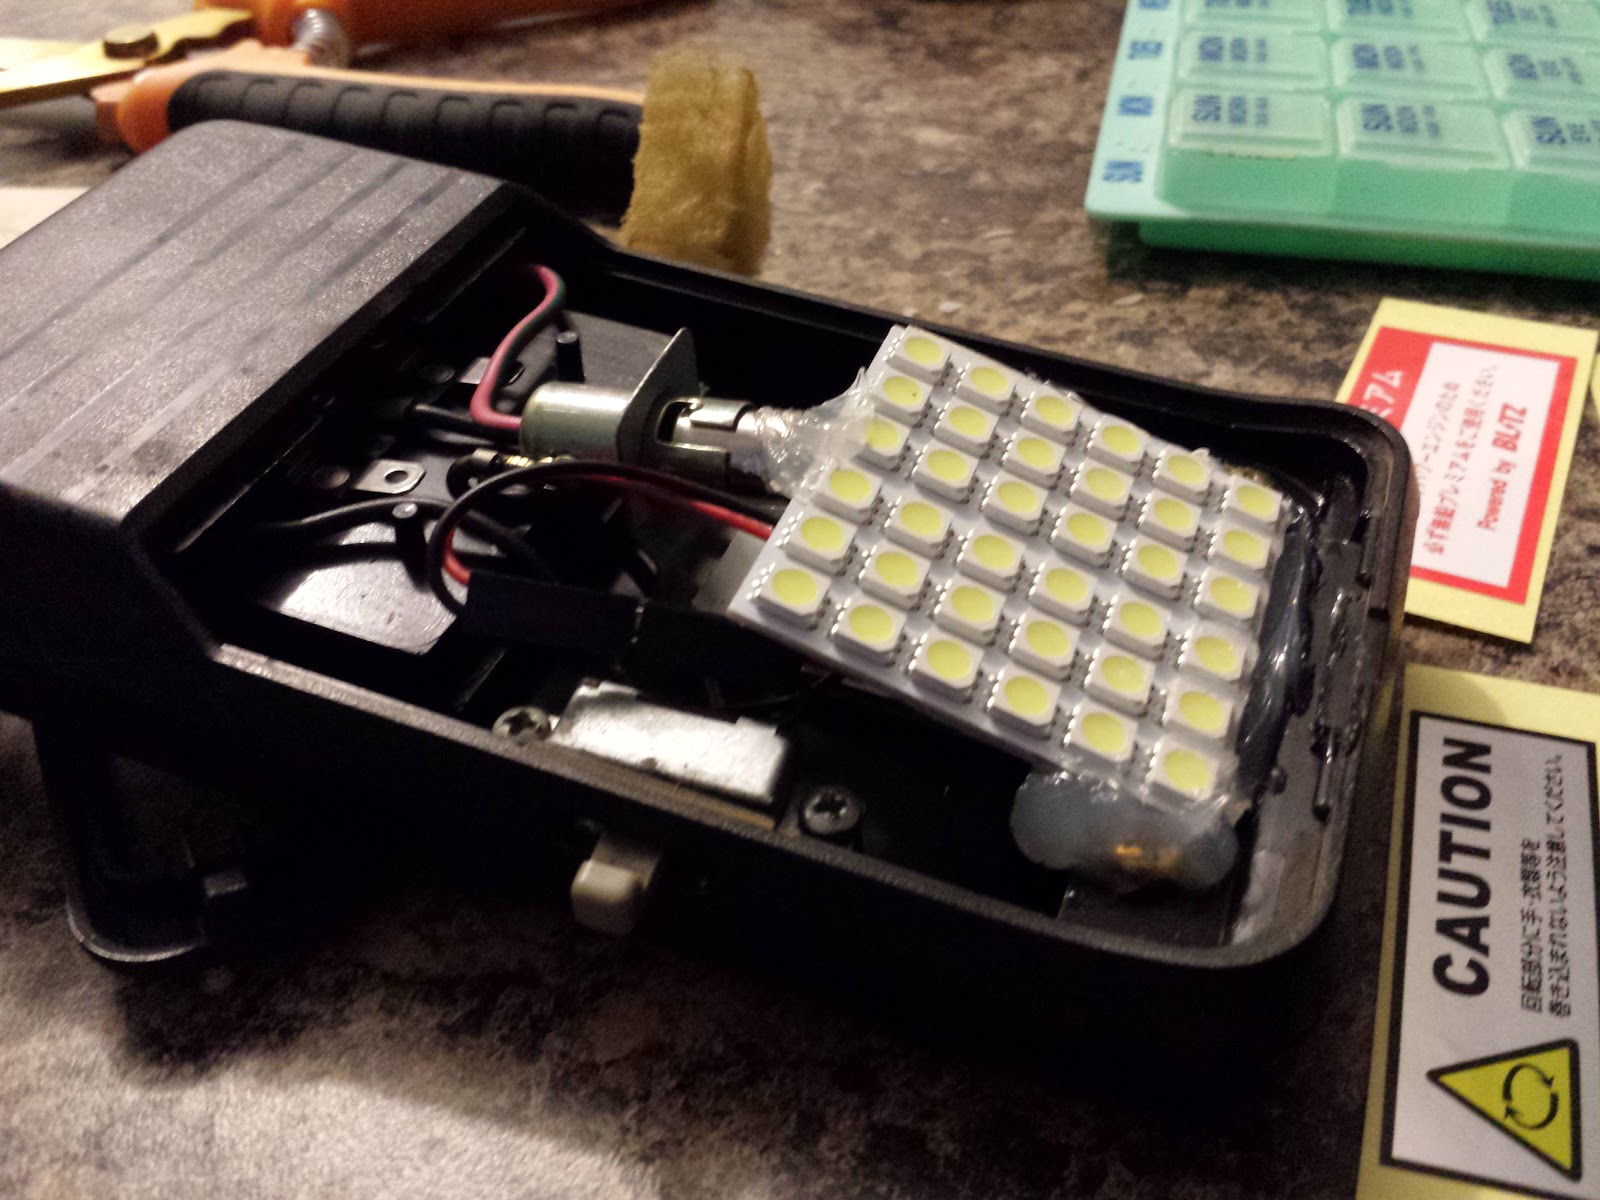
Here it is with the LED panel installed.  I put it at an angle so it would kick more light forward into the front of the cab.

It is real bright

Like, real bright. Daytime bright.

Progress with the dynama-like stuff install. 
Converting the dome light was real easy.  Took just a few minutes.  Converting the map lights was a bit more involved.  I don't have pictures of the work in progress unfortunately, as it took a while to find something that worked.  Ultimately I took the map light apart, cut all the original bulb stuff away (including the bulb holder), glued a bottle cap to what used to be the bulb holder area (to raise the LEDs closer to the lenses) and then glued the LEDs to the bottle cap.  I could have sworn I took pictures of it... but I have no idea what happened to them.


So... yeah... they turned out a bit too bright
After retrofitting the dome light, it was time to do something about that nasty headliner.  I was trying to figure out a good way to re-upholster it or something.  I'd tried cleaning it every way the Internet said but that didn't work.  Buying a new one was out of the question, as shipping would be impossibly high and no junkyards around here keep D21s anymore.  Then my girlfriend said "what would happen if you spray painted it?"  I didn't see any harm in trying it, so I did.


The right hand side here is painted, the left hand side is the original dirty nastyness
Holy crap, she is a genius.  It worked beautifully!  I couldn't believe how closely it matched the original color too. 

Here it is all done
Since the headliner was all sorted out, it was time to get this project finished up!  I had to cut holes in the roof around the rear view mirror mounting location, as the 86 trucks were never equipped with map lights and didn't have the recesses for them.  This was so painful...

I had to expand the cuts a couple times to get them big enough.  This was the first go.

Wiring for the map lights and dash cam (future project) installed.
 This was a good time to go ahead and install those lighted Pathfinder visors I've had for a few years.  My passenger visor had broken anyway and just flopped around.  So I went ahead and installed the wiring for the visors while I had this stuff all out.


Headliner back in
 I left the back portion of the headliner out, as I'm going to install a roof-mounted gun rack back there.  I've got the gun rack already, but the install will come later.  I've got other things I want to do first.


Glorious Pathfinder visors.

Crappy cell phone picture, but you can kinda see how closely the spray paint matched the grey of the visors.
 My plastic rear-view mirror mount had been broken before and glued together by a previous owner.  It broke again.  Rather than try to fix that one, I made a new one.  Out of steel.

Let's see you break this, gravity.

Map lights and rear view mirror installed
 I tested everything and it all works :D  It's all running off the dome light circuit, which probably would have been overloaded if I hadn't converted to LEDs.  I did most of the work here from June to September.  In early October, I decided to go ahead and get the truck's windows tinted.  I've been wanting this done for years but just hadn't done it.  The time felt right, so I took it to the shop and got some mad tint.  32% up front (per AL law) and 5% on the rear windows and back glass.

Mmmmm.... limo tint.... delicious!


So, that's how we stand now.  My passenger side door lock has stopped working again, so I'll have to revisit some of my old 2012 posts to find how I fixed that the first time.  This time I'm going to use new parts instead of used ones...  Also, I've got some rock sliders sitting in my parent's garage.  Going to be installing those soon.  Not sure what I'll do after that... but I'm sure something will come to me :)

Thanks for reading!