Monday, December 31, 2012

Problems continue, but I refuse to give up

As I mentioned in the audio post, the transmission on the Beast was nearing the end of its life.  A few weeks after that post I took it to the shop and had them check it out.  They said that the bearings and syncros had completely turned into powder and both the shafts were broken.  He was amazed the transmission still worked.  He said the damage inside was so extensive that he'd have to scrap that transmission, but had a source on a replacement.  I had them go ahead and do the swap.  It was expensive, but at least I have a running truck.  It was nice and quiet also compared to that constant droning noise the old one made.

Shortly after getting the transmission fixed, the noise from the driver's side front wheel was getting worse.  It seemed that every time I got up to around 30mph it would start making that whizzing noise and shudder when I slowed back down to around 20mph.  I figured this had to be the 4x4 hub since I'd replaced basically everything else on the truck.  To test my theory I removed the spring and brake for the 4x4 hub (this disabled the hub's ability to engage and effectively made the truck RWD).  Sure enough, the noise stopped.  I drove it like this for around 300 miles.  During this time the environmental controls broke -_-  Luckily I had a spare set of those sitting around I'd bought before for real cheap to have as a spare.  I haven't replaced this yet as it's pretty much always cold now so it's fine stuck where it is.  Temperature and fan speed still work, it's just stuck circulating air inside the cab and only moves between head/feet and feet/defrost rather than all the selections it should have.  The replacement panel is from a newer truck but should work fine.  I took the truck on a deer hunting trip in TN and did some off roading.  Even in RWD it did awesome.  I never got stuck and it crossed small creeks and very rough terrain with ease.  I drove it about 150 miles that day and didn't have any trouble at all :)

woohoo!
On my way to work one morning, the speedometer dropped to 0 and the odometer stopped counting.  From asking the guys on the forum, this is most likely the speedometer cable.  I haven't had a chance to look into this yet.

The truck sat for several weeks not being used because of holiday travel and a lot of long-range trips for work.  The Yaris gets such better mileage and is just easier to control at high speeds I drive it exclusively for lengthy trips.  It's also more comfortable.

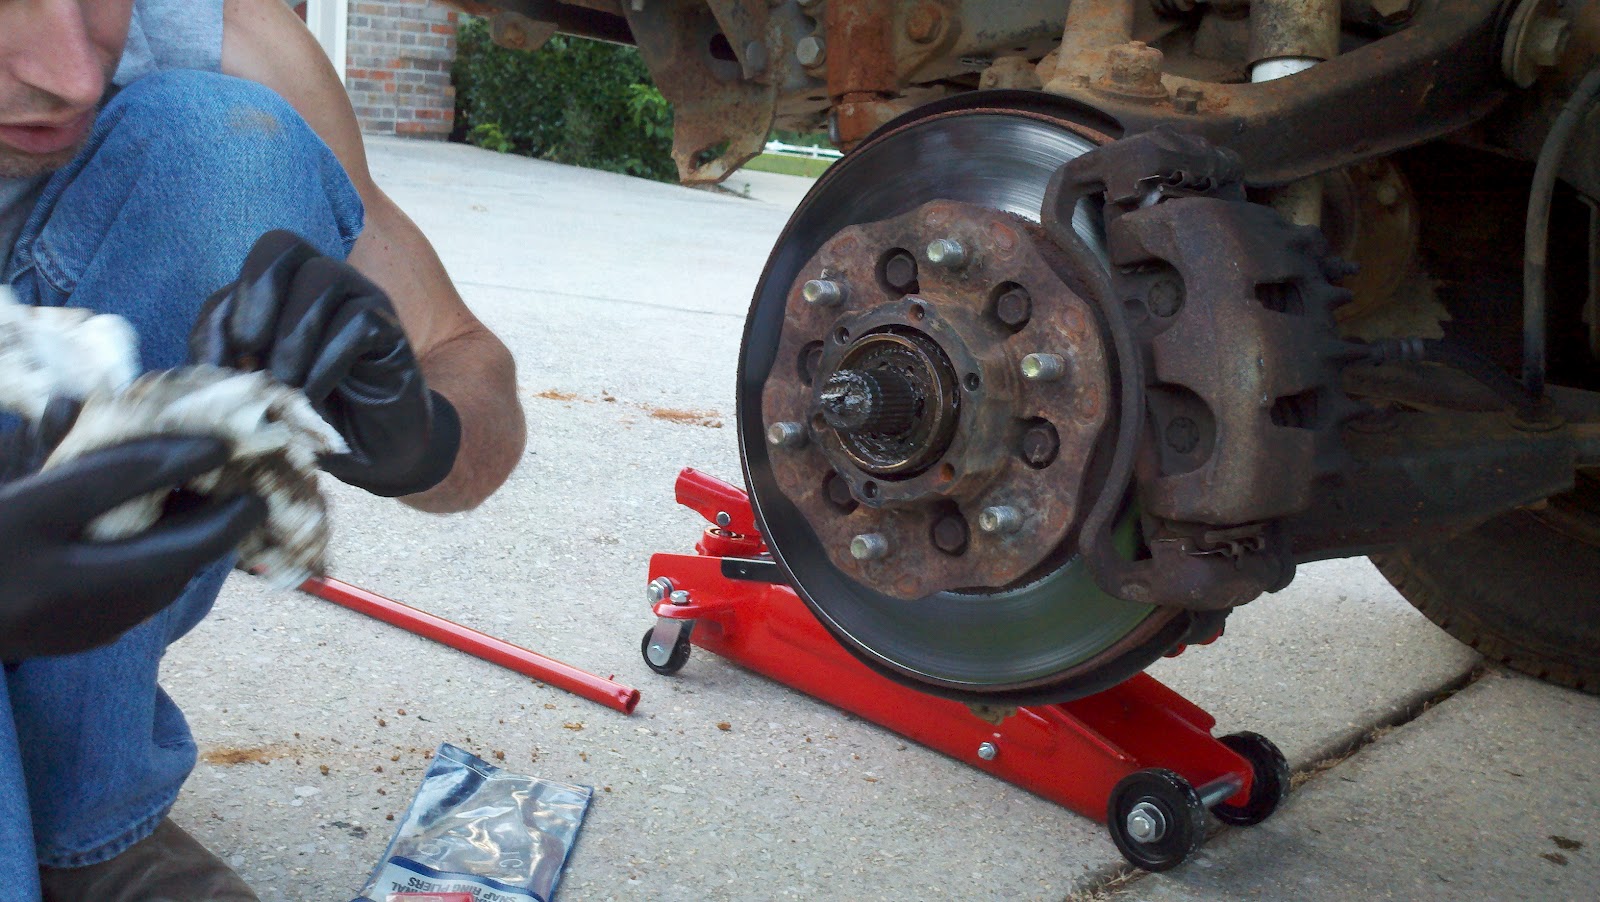
I got a set of Warn Premium manual locking hubs for Xmas :)  My parents got them for me and I had to wait a little while to get some time to install them, but last night I put the truck in the garage and went at it.  The instructions are about as clear as the TN river, but with the help of a youtube video I got them installed correctly.  I haven't had a chance to test them yet, but they switch between lock and unlock with ease.  They seem to be quality pieces.  My only complaint is that the studs it comes with aren't grade 8.  I easily broke one of them off :/  I need to redo the passenger side hub anyway because I didn't do it right, it works but just isn't as clean as I like and needs to have that stud replaced.  I actually have some pictures of this haha.


Driver's side

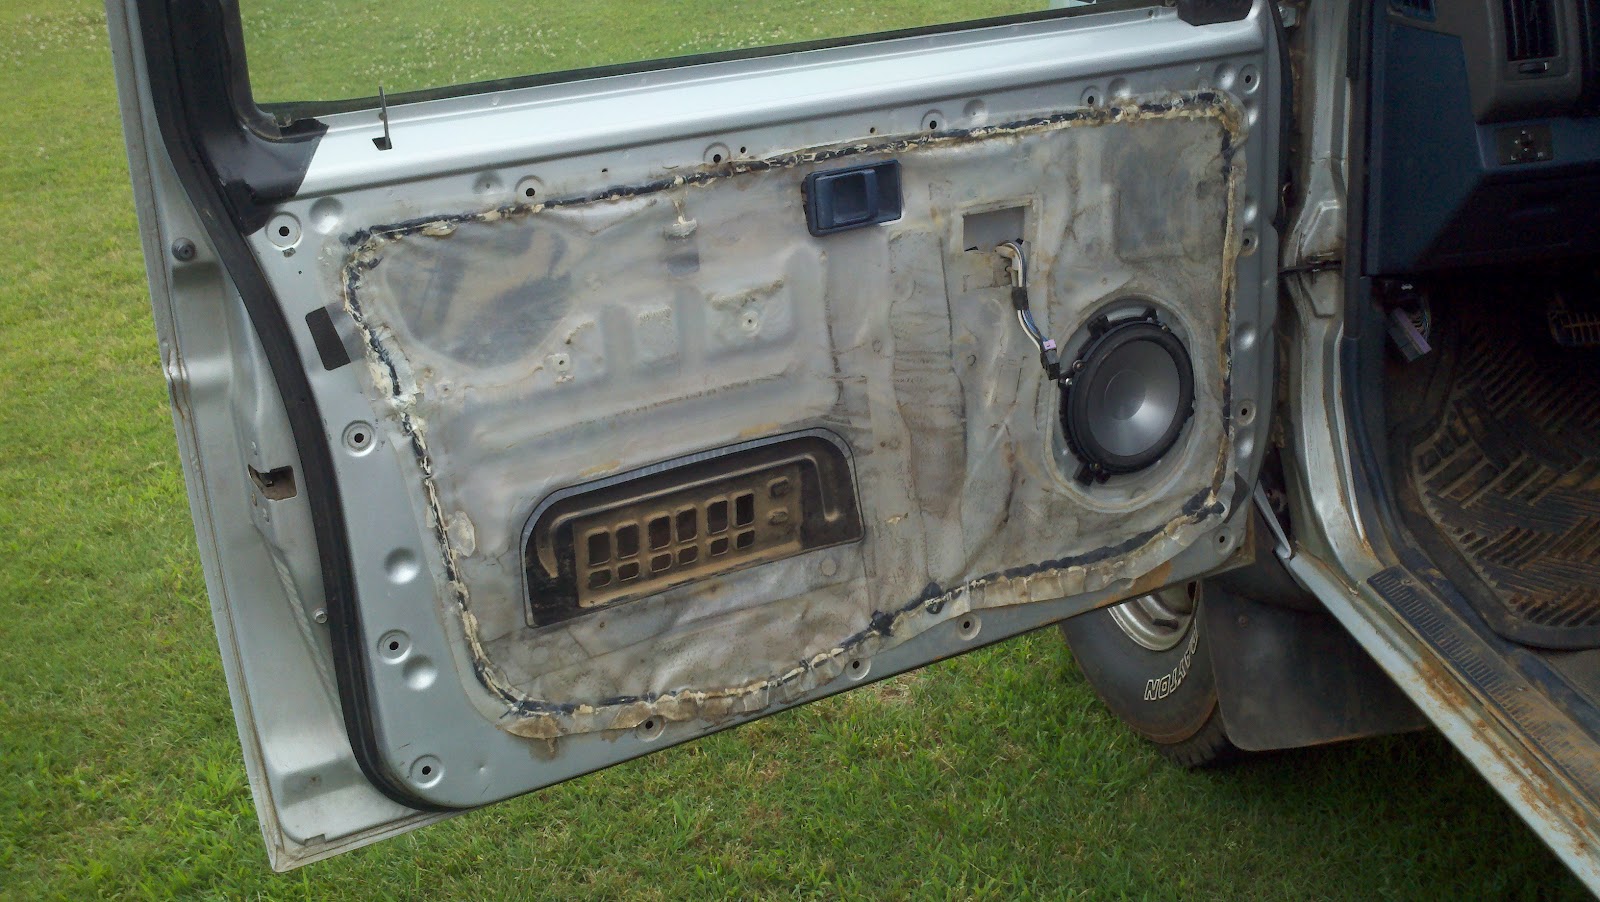
Passenger side, note the broken stud


All the greasy parts removed from the automatic hubs were placed in bags with the respective hub and put into the Warn box.  I'm not sure if I want to keep these or sell them.  They could be rebuilt if someone had the parts, I was just unable to find them.  I'm going to update the to-do list with the new problems, but hopefully they will be pretty easy to fix.  It seems like every time I get something working something else breaks.

Tuesday, October 9, 2012

Audio done! Transmission is also :(

Got back to work on the truck some yesterday and completed the audio install.  It looks great!  I thought some other people might find this useful, so I detailed my speaker mount modifications more in this post.  Here's what I started with for the rear speakers.

L to R Infinity Reference 6.5" w/ grille, OEM speaker housing, OEM speaker mount, Infinity mounting bracket, foam pad
The OEM speakers looked like this


I wanted to keep the new install as close to OEM as I could, but needless to say that speaker grille had to go.  Also, the speakers that were actually in the truck are more like 6.3" or so, they are just a bit smaller than a standard 6.5, but the mounting bracket was big enough to easily accommodation the 6.5 with minimal modification.

To begin with, I removed the OEM speaker grille from the plastic housing.  The Infinity speaker wouldn't fit in the housing like the OEM one did because of the difference in diameter, so I did some measuring and figured out that I could trim away the inside of the plastic housing and some of the Infinity bracket and make them fit together.  I went ahead and mounted the Infinity bracket to the OEM housing (drilled/riveted) to make it easier to work on.

Removed 2 of the screw holes and trimmed about 4-5mm from the inside.

If you notice near the rivets there are sections that are milled out, this is where the OEM housing fits

As you can see, the height of the OEM screw holes is almost exactly the same as that bit of the bracket I milled away.  This worked out nicely and allowed me to set the Infinity right over the top of the plastic housing and mount it to the Infinity bracket, using just the pressure of the speaker to hold it down.  This also left enough room between the bracket and the plastic housing for the carpet to fit back under there.


Here they are installed, with the carpet back up on the rear cab wall.  Unfortunately due to a change in how I did the right vs left side I had to use different screws for the right one, so they are silver instead of black. I'm going to touch this up with some black paint later to make them match.  The seats don't fold down on the sides anymore, but I wasn't planning to use those anyway.  Later if I decide I want the seats to fold I will remove the Infinity speaker grilles, but for now I'm leaving it that way.

Unfortunately, Friday I learned that my transmission is at the end of its life.  I'm having problems getting the truck into 2nd gear and it makes a rumbling noise at idle when the clutch is engaged.  I made this video a few days before taking it to the shop before I was certain that the transmission was where the noise was coming from.


It's going to be $900+parts for a rebuild, or $450-650 + $400-500 for a used one plus install.  I'm leaning towards having it rebuilt just to make sure I don't inherit problems from another vehicle with a used one.

Friday, September 21, 2012

The Beast lives!

Been a little while since updating, but there's been a lot of work done.  After talking with several people I decided not to bother with changing out that damaged piece of the 4x4 hub.  I regreased the old parts and reinstalled those, finishing up the hubs.  I was so excited :)  Sure that it wouldn't take long to bleed the brakes and get the truck rolling, my buddy Louis came over and we started working on them.  Fluid didn't seem to be passing from the master cylinder into the brakes.  They had been hanging disconnected with the lines empty for a while, so Louis got out a vacuum pump and started trying to pull fluid through that way.  It still wasn't working.  Louis said that the master cylinder piston(s) may have gotten stuck from the lines being empty or something, so we took the master cylinder off.  We cleaned the outside of the master cylinder and dumped the old cruddy fluid out.  I bought some new brake fluid and some brake cleaner, so we took the master cylinder apart (couldn't get the rear piston out though) and cleaned everything real good, then tried to do a bench bleed.  We weren't having much luck with that, so decided to just toss it on the truck and bleed it at the master cylinder.  We still weren't getting fluid movement from the MC to the calipers though.  Another day, another problem.  Louis went home, defeated.  I tried again later to get the MC working.  Took it back apart and managed to get the front brakes moving fluid, but the rears wouldn't budge.  Frustrated I got on ebay and bought a new one for $47 shipped.  That arrived, I filled it with fluid, bled it, and installed.


It looks really out of place being so clean and shiny, but I opened the bleeder valves on the calipers and let fluid drain down the lines, then bled it at the wheels and everything seemed fine.  By the time I got everything ready to go and the wheels back on, it was pretty dark.  I backed it out of the garage and drove it around the yard a little, breaking the new parts in.  Steering felt great, but the brakes were a little squishy.  Later we found that I hadn't tightened the MC bleeder valves enough.  While dad was holding the brakes I tightened all those back up.  Good news I guess, is that I got a good bleed out of it haha.  Once that was tightened the brakes seemed fine.  I parked it for the night to come back tomorrow.

Old MC and a collection of rags that have built up since this project started
The next day dad and I got in the truck to drive it around the block.  The alignment was awful.  I didn't get it much over 25, but it was wearing hard on the tires.  One lap around the block and I was done.  The next day I had a local company tow it to the alignment shop.  I didn't feel like trying to do an alignment, so for $65 they took care of it.  After that, the truck was great!

Here it is chilling at a client site
I've been driving it around for about 2 weeks now and love it!  It drives so much better with the new steering parts.  Feels like a different truck!  Not having the brakes dragging means that it climbs hills and accelerates a lot quicker too.  I really enjoy it.

Since it sits outside, I installed a set of wheel locks to keep someone from jacking the wheels/tires.  Also got a replacement rear center cap since it's been missing for a while.  Installed that and retentioned the e-brake cable one evening.  It's coming together!  I still need to fix the headlight switch and finish the speaker install, but it's coming along!  I updated the to-do list a few minutes ago to reflect the current status.

Tuesday, August 28, 2012

MOAR steering shenanigans

Moar updates on the steering situation. Most everything is done now :) but there's still some more left. Going ahead and posting this up to try to keep post length down.

SO... last we left off I had pulled the CV boots and ordered new axles.  Those came in late the next week, so off with the old and on with the new.  Yanking the axles wasn't too bad.  I did have to remove the front shocks though.  Basically stripped the front end down to where only the torsion rod and A arms were left.  I bought a pipe wrench to use to hold the axles while removing the bolts.  Being careful, I managed not to damage the axles any.  In about 20 minutes or so both old CVs were free.  I boxed the old CVs up thinking that I needed to turn them in to O'Reilleys (I had ordered repro axles) but I ended up getting new ones instead. I haven't heard many good things about the new axles, but this was a different brand and has a 3 year warranty so oh well.

A grand struggle was had to get to this point.


yummy
Picked up the new axles and put them on in the same manner, using the pipe wrench to keep them from moving.  Putting them back on took a little longer than removal, but that's pretty normal.
So clean...so shiny
After installing the axles, I had to get those spindles back on.  I installed the remaining upper/lower balljoints I hadn't done already.  After that I had the incredibly frustrating job of mounting the spindles back in the A arms.  I ended up having to jack the A arm up as high as possible without lifting the truck off the jack stands, then use one of those awesome ratchet strap deals to pull the upper and lower together enough to get the bolts in.  Before coming to this conclusion, dad and I tried everything in our power to hold the pieces together by hand or by using C clamps.  All of those attempts failed miserably.  I had completely forgot about buying that ratchet strap deal (I got it on sale over a year ago and never opened it).  After getting the strap it took about 45 mins/side to get the spindles installed.  Got those bolts all tightened up, installed the shield thing for the rotor, bearings, and hub/rotor itself.

Getting this far took entirely too long.

After getting all that crap done, I rebuilt the tie rods and installed those.  The tie rods weren't too bad, but it did take about an hour to finish them.  Getting the old ends off required me jumping up and down on a couple wrenches after soaking them in Liquid Wrench.  Installing the new ends was easy enough.

New rod ends make that center piece look like a dog turd.
Installed the tie rods, then the 4x4 hubs and calipers.  While installing the 4x4 hubs I noticed that the passenger side free running hub brake system was damaged.  After talking with the guys on Infamous Nissan I decided it would be best to replace this part.  I'm currently waiting to get a new one.  Hoping to have it next week.

Nissan Hardbody freerunning hub brake system: limited dildo edition
So I think this gets the blog up to date.  I'm trying to make it more picture heavy and less wordy, please leave feedback on what format you enjoy more.  Here's a couple pictures of what she looks like right now.  I REALLY want to have the truck drivable next week.  All that's really left to do to get her running after the 4x4 hub is bleeding/refilling the brakes.  Hoping my buddy Louis can come over and help with that on Thursday.  Once she's working I'll do some of the smaller stuff on the to-do-list post from earlier in the year.

This is the side with the jacked up 4x4 hub part (passenger)
The driver's side, all good except one bolt on the 4x4 hub that has a dirt dauber nest behind it

Friday, August 17, 2012

Steering shenanigans part 2

Continuing with the front end work, yanking the spindle was a royal PITA.  The left side upper balljoint was a horror.  I beat on it and beat on it to get it out of the A arm, but it didn't want to budge.

Photographic evidence of a ball joint being a douche bag.
I sprayed WD-40 on it and tried beating it to no avail.  Tried liquid wrench and moar beating and still nothing.  Sprayed it again with liquid wrench, then just moved around to the other side.  Took the bolts out that hold the ball joints in on that side and the spindle just came right out.  Would be nice if it's brother on the left side wouldn't be a jerk, but oh well.  After getting the left side I got ill and beat the right side with all my might.  Eventually the balljoint came loose.  A friend let me borrow his OTC front end kit so I could pop the ball joints out.

Tools and stuff. Srs bzns.


You know you're having fun when the 3lb hammer comes out.
I bought a OTC balljoint press so I could put the new ones in.  Installed the new ball joints in the spindles and installed the new rotors on the hubs.  Rebuilt the brake calipers with my buddy Louis (thanks again!).  Getting closer...

Look at it.
Time to do something about these CV axles... After much thought I decided I'd try to rebuild them, then was like j/k lol I'm just going to buy some rebuilt OEM ones from O'Reilleys.  

Looks tasty amirite?
I went ahead and yanked the boots just to see the condition they were in, and think it was a good idea to go ahead and replace them.


The new CV axles aren't in yet, probably be here next week.  I'm ready to get this thing drivable again...  Dad's getting ancy for me to get it out of the garage, and I'd like to have it running myself.  There's already been a few times it'd be nice to have a truck again.  Hope to have another update next week after the CVs come in.  Wanted to go ahead and get the progress so far just so the next post won't have to be horrid long.

Pile of old truck parts and the old header from the Yaris.

Wednesday, August 1, 2012

Steering shenanigans and other srs bzns

Yep, it's been almost 2 months since the last update.  I can barely even fathom how busy I've been.  Working 12+ hour days, weekends, etc. has just been seriously stepping in on truck time.  I've been able to work on it here and there, but it's been such small steps I felt it wasn't worth writing about.  Since the last update, the truck started making a weird noise coming from the front driver's side wheel.  Also, the brakes got squishy and the wheels would heat up shortly after driving.  Blarg.  Parked it for a while until I had time to meet up with some friends and see if we could figure out what's wrong.


My buddy Louis came over one evening and we drove it around for a while.  4x4 worked, truck seemed fine, then the noise came.  Louis thought it might be the 4x4 automatic hub derping, so we started taking it apart.


Examing the 4x4 hub parts

inside the 4x4 hub


So this was fun, but while we had it apart Louis noticed that basically all the ball joints needed to be rebuilt, and that both of my CV boots were proper jacked.  One had been gone for who knows how long, and the other recently burst.  Also the brakes were seized (which I had suspected due to the heat).  Began to suspect something may be wrong with the CV or bearings, but taking the hubs and all apart was going to take more time than we had, so we put it back together and it sat for a few weeks.


Later, I got permission from dad to park The Beast in the garage for prolonged work.  Popped off the wheels, 4x4 hubs, etc. and noticed the brake pistons were indeed stuck engaged.  We dinked around with these for a while, and eventually got them loose.  Purchased caliper rebuild kits.  The rotors were pretty worn and somewhat jacked up from the seized piston, so I went ahead and got new rotors as well.  Also bought all new ball joints.  All this stuff together was less than $150 :)  Getting the hubs and rotors separated was tough... took several minutes on each one with a 3lb hammer to get those things loose.  Also got the cotter pins out and the nuts off the ball joints of the steering arms on both sides. Going to have to find a ball joint press to rent/borrow to actually get the arms loose.


Truck's new home in the garage :) Note the Hayne's manual on the hood

Wheel hub and rotor off the spindle

Shiny new rotors

Rusty old calipers

Awesome jacked up rotors and pads
In the meantime, there was audio to be worked on.  I got a set of Infinity 6.5s to match the fronts.  The factory rear speakers have a nifty little blue housing around the grille, and I actually like the way they look, so I wanted to keep that as close as possible.  The rears apparently were blown out at some point, either way neither of them worked when I got the truck.  To keep the factory blue piece and whatnot required some serious Dremel work, a lot of patience, and even more time.  Here's what the factory speakers looked like.

Not bad by any means, but this one is pretty dirty. I liked the look and wanted to keep it pretty close to stock.  The Infinity speakers though, of course, have significantly larger magnets.  In fact, the magnets touched the back of the cab, so I had to make some plastic spacers to put in between the bracket that mounts to the cab and the cab wall itself, then put spacers between the speaker and the bracket, which were just thick enough for the blue trim to fit in between with some careful Dremel work.  Since this was the first run, I forgot to take pictures of what I did, but I'll definitely do that on the next go round.  I'm really happy with how it turned out.


The Infinity speaker definitely looks more legit.  Not very 80s, but they just sound awesome.  As I make the next one I'll take progress pictures.  It takes a lot of work, but I think it's worth it.  There's carpet against that cab wall too BTW, but I won't be putting that back up until the speaker work is done.


So yeah, right now The Beast doesn't move, but is getting closer and getting some much needed parts replacements anyway, so the next time it's up and running it should be better  to drive than before.

Monday, June 4, 2012

Been a while, but here's some interior progress

Been a while since I've posted any updates.  Hasn't been a lot of huge progress and I've been busy with all sorts of other crazy talk so I just haven't had time to work on it much.  Anyway, here's a status update:


I got tired of driving around without door panels, so my dad and I worked to figure out exactly what part of the door lock on the passenger side was broken so I could reassemble the driver's side door and order the parts for the passenger side.  After looking at it we figured out that there is a little tab missing on this piece of the lock mechanism.


The part that holds that whitish plastic piece to the metal rod that operates the lock is missing.  I ordered a new one of those white pieces which will hopefully be in today or tomorrow :)  Since we what to replace and how to fix it, I went ahead and set out to put the driver's door back together.  It took forever, but eventually I found something that I thought would be a suitable adhesive.  It's called Windo Weld by 3M and worked like a charm.


The previous owner had already cut the hole out for the speaker, so it's just in there without any plastic to protect the wiring but I think it'll be OK.  I've been driving it without the plastic on there at all in the rain and everything else and haven't noticed any leaks.  Anyway, this took about a week trying to find that Windo Weld stuff.  Then I had to order new plastic clip deals to hold the panel back on.  During that time I figured I'd go ahead and fix the damage that the PO had done to the door panel.


When he replaced the mirror after the accident, instead of taking the panel off he just tore the corner so he could get to the mirror backplate -_-  Some Gorilla Glue fixed this up.


So yeah, I got a little bit excessive with the glue...
After that dried it was another couple of days before the new door panel clip things arrived (bag of 50 was $12 shipped).  I replaced all those and reinstalled the door panel.


It still needs to be cleaned up some, and unfortunately I'm still using the arm rest that's covered in duct tape until I can find a replacement.


Another thing that wasn't working was the dome light.  Well, first of all it was installed backwards.  The dome light in these trucks is supposed to flip down so you can also use it to illuminate the bed.  The PO had installed it backwards so when you flipped it down it didn't do anything useful at all.  I reoriented the dome light and began tracking down what was wrong with the door open sensor.  All the wiring looked good but it didn't ding when the key was in and the door was open on either side.  I checked the passenger side door open sensor and it was connected.  Checked the driver's side and it was not.  After some work (there's barely any slack at all on that wiring) I got the sensor reconnected and reinstalled.  After this I closed both doors and cycled the power on the truck, then opened the door and it started a pleasant little charm sound.  I wish all cars sounded like this, it's not deafeningly annoying like most modern door-open alarms.  The dome light now fades in and out nicely :)


It's so nice having light in the cab... during the night it was practically impossible to see anything in there, and with the on/off switch being on the wrong side it was easier for me to just use my cell phone flashlight than it was using the dome.  I've also ordered a set of factory map lights :)

Monday, May 14, 2012

Achievement Unlocked: FAIL harder than ever before

I find it hard to put into words my feelings after work today.


Despair, regret, frustration, confusion... none quite get it.


Here we go.


A friend of mine told me that a good way to test the 4x4 on a truck was to find a gravel road or some such thing, turn the wheels and dump the clutch to see if gravel/mud/whatever slug from that side, then repeat for the other side.  We've been having a lot of rain lately, and on the way home from work today I found this place:


Red circle = my doom

It actually is worse in that picture than it is now (the area wasn't completely flooded) but it was still rather squishy.  I was doing about 30 when I saw the going get rough and braked.  I slid roughly 100 yards and didn't move again after that.


4x4 != Godmode
I think it would have been ok if the front passenger wheel hadn't sunk up to the rim.  Even in 4L it would rock a bit but just wouldn't get out.  I had a 2x6 in the bed and tried to wedge that in there, but it was just too soupy.  The tires on that truck are clearly not meant for this type of activity.


I've never been in a situation like this and had no idea what to do.  I called my dad, who retrieved a tow strap and began en route in his RWD 05 Silverado.  His expedition was unsuccessful.


Dad got to approximately to where the blue circle is before his truck nosed into the mud and wouldn't move anymore.  At this point we balked and called a wrecker, who would be there in an undisclosed amount of time.  During this time we flailed about madly for roughly an hour and managed to get his truck free.  By this time it's 7pm and dusk.


The wrecker arrived and was like "lol, I can't go back there" and left.  This is where I reached the very depths of the pits of despair.  All hope was lost.  I was unwilling to accept that I'd have to leave the truck out there for who knows what to happen to it... but could see no other option.  Eventually the guy that owns the land drove up.


Luckily, he was a decent fellow.  After talking to him for a while he said that he'd pull me out for $100.  Great, done.  He retrieved a dozer and yanked the truck out.  At 8 I was back at home, 3 hours later.  What I'd intended to be a 10 minute 4x4 check turned into a 3 hour debacle from the pits of hell itself.


Lessons learned:


4x4 != godmode
I am a huge n00b
My dad is awesome for being cool the whole time
Silverados are entirely too heavy
Never derp on private property again
I am a huge n00b
Roads are good ol' guys, and from now on, I believe I will use them.