Monday, April 30, 2012

4x4 Fender installation

This weekend I really wanted to get that fender completed, so I got with my buddy Dennis to see if he could meet up to paint it.  I got the paint matched on Friday and then met up with him Saturday.  We didn't have a paint booth or anything, so just set it outside on a table and went at it.


I let Dennis do most of the painting since I wasn't familiar with paint guns.  I've always just rattle canned anything that I painted.  I did put the last coat on though so I could say I contributed, lol.


It would have been an awesome idea to have masks


Since we were outside some freaking bugs and whatnot kept getting on it.  It ended up with a smattering of grit and other crap in it, but I'm planning to wet sand the bigger stuff down and then will just leave the rest.  As long as it's the same color I'm not really worried about it being super pro.  We put about 4 coats on it.  I left it at Dennis's house to dry, then he dropped it by my house Sunday morning.


I  went out and bought some new bolts to install it with (the OEM ones were very rusty and I sheared one of them).  Then set the fender up temporarily just to see what it looked like.


New paint is quite a bit shinier than the old, but a good color match
I didn't get to do much else with it Sunday (busy day), but after work Monday I got to bolt it in place.  The bottom edge of the fender near the door didn't quite want to line up right.  I decided I'd worry with that later.  I got the rest of the fender lined up (though it was a big of a pain, I think it got slightly warped during storage) and tightened in place.  One of the new bolts I bought was defective and sheared off, but I was able to get hold of it from the bottom side and remove it.  I bought 5 extra bolts/washers just in case something stupid like that happened.


Installed the blinker, the bumper endcap, windshield cowl, wipers, and cowl vents, then went for the fender flare.  Since this fender didn't include the clip things that fit over the screwholes (and the old one didn't have them either) I had to use screws/nuts to hold it on, but it turned out well enough.  The mud flap was a huge PITA on this side just from all the jankiness of the wreck the truck had been in previously, but overall turned out well.


Friday, April 27, 2012

WTF[ender]

Yesterday my plan was to drill out that bolt on the gas tank skid plate and replace it.  After several minutes of drilling with barely any identifiable progress, I bailed on that.  A job for another day when I can get it on a lift or something.  I decided to go ahead and work on the fender.


Before getting the paint matched and whatnot, I wanted to do a test fit on the new fender. Removing the old one revealed some interesting things about the rusty parts under the hood... Some of those metal panels are rusted so bad they are zip tied on, lol.  I'm just going to leave it that way until it necessitates replacing.  Anyway, fender removal wasn't too hard.  All the bolts need replacing.  One of them sheared, but it's the easiest one out of all of them to get to, so I'm not real worried about it.  Dad helped with the removal so I wouldn't accidentally the fender or something.


Remove all the things
The upper portion doesn't look bad, but that part behind the bumper is what's zip tied on.
I'll take this to get the paint matched
Once that one was off, I took the new one out of the packaging.  We did a quick test fit to make sure it wasn't going to need modification.


That's much better :)
I have the original (wrong) fender in the back of my car to take to get paint matched today, then tomorrow a friend and I are going to spray it with his paint gun.  Should be able to get the proper one installed Sunday or Monday.  After that I'll get to put the final fender flare on :)

Tuesday, April 24, 2012

Victory over stereo equipment

I was hoping to work on the truck yesterday, but I went to an award ceremony for my sister that ended up lasting 3 hours... so didn't do anything on the truck at all.  Today was another story, I still got off work late so didn't get as much done as I wanted, but I felt like a huge victory was accomplished.  I was afraid, after finding the head unit going to Protect mode, that I would end up having to re-run the speaker wires to the doors because of a short.  It turns out the fix was much easier.  The truck's stereo wiring harness uses the same wire colors over and over (green, brown, black, pink) with a few random ones mixed in.  Apparently, after some time of trial and error, the original owner got frustrated and decided to go a different route.  Rather than actually find which brown/black wires went to the speakers.... he just spliced them all together.


Yeah.


Think about that for a minute.


Yep.


I'd like to think that he at least checked them for voltage first.... but based on what else I've seen in this truck so far, I'm really thinking he just grabbed all the brown wires and mixed them together.  For some reason the Dual head unit that was in it before worked in this manner (that says something about how crappy they are if they don't even check for wiring faults).  Anyway, I used my sophisticated speaker tester array (my Droid X connected to a 1/8mm jack with a 2-way RCA splitter on the end) and tracked down which wires actually went to the speakers.  I cut away all the others, taped it up, and plugged the radio in.  Bam!  It worked.  Victory!  I reconnected the rear speaker wires and tested, still worked :)


So yeah, the Kenwood isn't very 80s, but I like it.

Passenger woofer and temporary tweeter location

Driver woofer and temporary tweeter location
Also, today the speakers I'm going to drop in the rear came in :)  I got some Infinity Reference 6032si (they match the component kit) to go in the rear.  I test fit these and they just baaaaaaaaarely fit in there.  The magnet of the speaker is actually touching the back of the cab, lol.  I haven't decided yet how I'm going to mount them, but it looks like they should fit.  Hopefully Thursday I'll be able to get those installed.


So yeah not much as far as progress, but it feels like a huge victory.  Having a radio is pretty nice :P

Monday, April 23, 2012

The Beast has been awakened

Friday evening I finished up the dash installation by installing the remaining panels.  I wanted to test the speedometer and other gauges, so I connected the battery to crank the truck up. Unfortunately the battery was so weak it would not turn over.  Apparently repeated use of the power locks just ran it down over time.  I went to Target and snagged some jumper cables, then cranked it up off my Yaris battery.  I was excited about it cranking up and the gauges seeming to work, so we took it for a short cruise around the block.  All seemed well until I went to turn the radio on.  "PROTECT" was the only thing across the front of the radio :( Apparently there is a short in some of the factory speaker wiring somewhere.


The dash with panels added in, but the radio bezel removed for testing the wires.


Not sure which wires might be the problem, I went ahead and cut the rear speaker wires away from the harness (as painful as it was) and then re-tested.  Still protect...  The previous owner only had the driver's side speakers connected, so I'm guessing that the short must be somewhere in the passenger side wiring.  Either way, I think I'm just going to replace all of it to be safe.


The rear speaker wiring


I also reinstalled the skid plate that protects the gas tank (this had to be removed to swap the e-brake cable).  Unfortunately during removal I ended up breaking the head off of one of the bolts, so I will have to drill this one out and replace the bolt/nut.  I went ahead and replaced all the other bolts with new ones just in case.  I properly tensioned the e-brake cable and tightened down all the bolts and connecting joints on that.  Went ahead and installed the rear driver's side fender flare also.  I had a spare exhaust tip lying around so I threw that on there for lulz.  It actually looks pretty good on the truck IMO.


I discovered a couple of other problems with it while driving it Sunday.  For one, I forgot to add additional coolant after replacing that part of the AC.  It got pretty hot but I didn't drive it long so it didn't get into the red or anything.  Going to add coolant when I get home.  The headlights don't seem to work on dim, but I'm not sure if the bright setting is actually bright or if it's actually the dim setting.  The headlights were re-wired at some point.  I'm not sure if he added HID or what exactly, but I may just trace the wiring back to the fuse box and redo all of that to be safe.

Friday, April 20, 2012

Droppin' in the dash

Yesterday I got the blog mostly caught up.  After this post, it will reflect exactly the current state of the truck.  Updates will slow a bit (sorry for the flood) but progress should continue moving pretty well.


Yesterday after work I came home excited to see that my side AC vents had been delivered!  Pumped, I grabbed the dashboard from the floor of the garage (with newly installed grey dash cap) and brought it out to the truck.  Opened the door and tried my best to get it in there, but doing anything with the dash is really a 2 man job.  I cleaned the dash up until my dad got there and we began the dash install.  It was not very fun remembering how to route all the wires, but eventually I got it.  With his help I was able to get the dash set back down, then started the fun process of screwing everything back in.  I made the mistake of not marking which screws went where, so it took a bit of trial and error to get right.  Still a fairly long way from having the dash all the way there, but I got the main piece mounted as well as the new head unit installed.


I haven't installed the driver's side AC vent yet (I wanted to be able to get to the fuse box wires from there if necessary), or the side vents, or the top vents.  I haven't yet decided if I want to look for some grey ones or just to try to paint match the blue ones, or just to throw the blue ones in there as is.  For the moment, I'm just going to let it sit like that.  When I get home today I'm going to try to install some more of the dash panels, the instrument panel bezel, the glove box, and the steering column cover.

Thursday, April 19, 2012

More dash restoration, and a bit of flare

Continuing to work on the restoration of the rear-section of the dash, I completed the duct work install.  Thanks to my buddy Dennis, who sandblasted the main dash support bracket and primered it for me :)


Looks so much better with the silver-colored metal rather than rust.  Also, those ducts were all absolutely filled with dirt, dirt dauber nests, and other nasty business.  It's hard to tell from the pictures, but I cleaned as much dirt as possible from all the surfaces of the dash during the rebuild.  If you compare this picture to the first one where the dash is removed, you can see how much more vividly the black stands out.

Also went about rewiring the radio harness.  Unfortunately the previous owner did some pretty janky wiring, so that wasn't particularly fun.  A lot of googling and wire tracing later I figured out what each wire did and connected the new radio harness.

Before:


After:


Apologies for the blurriness.

Waiting on some pieces of the dash to come in.  While doing that, I had ordered a proper 4x4 fender for the driver's side as well as a set of fender flares.  When the fender/flares arrived, I was happily greeted with a set of mud flaps also!  Awesome!  I always feel like a douche driving a truck without mud flaps during the rain.

The flares/flaps are actually from a Pathfinder.  The front lines up perfect, but the rears require modification.  I'm not one to fear modifications.


Bam... so sexy.


Mmmm just look at that flare.

After looking over the rear ones and doing some test fitting, I decided to tackle that.  Dad came out and helped, so that made the job a little easier having someone to hold it while trying to drill holes and such business.  About 45 minutes or so and I had the first rear flare mounted.  To get the flap installed in the rear I think I'll have to remove the wheel so I can drill a hole, so I'll do that later.


Best buddies :)

She's already looking pretty awesome!  I hope to get the proper fender painted and installed next week, then put the flares on the driver's side.  Right now the passenger side is the only one with flares on it.

As you can see in the picture above, one of the little plastic hood grilles is missing.  It actually flew out one day while I was driving it.  I looked on ebay and found one for $8 shipped.


At this point, the blog is caught up until about 5pm today.  This evening, the side AC vents arrived and I was able to drop the dash in :)  Couldn't get any pictures because it got dark and I was in a hurry to get as much done as I could.  I'll definitely take some pictures in the morning and post another update.

Here we go, yanking the dash and fixing the e-brake

The e-brake was one of the biggest things I wanted to get done, namely because I didn't like the thought of leaving the truck on chocks when in public areas where some douchebag might yank the chock and push the truck down a hill or something.  Even though I did leave it in gear, it still just made me nervous.  So I decided to follow the cable from cab to wheels and see what I had to work with.


Ok, so that's pretty disgusting, but the cable appears to be in good enough shape on the handle and is attached, so under the truck we go.


Ok, well that's connected, but as you can see the coating as come off and the cables are a little frayed around the entrance to the thicker coating.  Potential problem point #1.


Ok that.... doesn't look good at all.  How did that even happen? Why? What is even?  Definitely problem point #2.  Upon finding this I was still hopeful I could salvage the cable, because even though the coating had been removed and it was all rusty looking, the actual cable itself still seemed to be intact.


Well the rear section of the cable looks fine, so that's a plus.


Ok, so that's the first thing I'm going to address.  I don't know if the pins just rusted out, or maybe the previous owner disconnected it for some reason?  Who knows.  I grabbed a set of calipers and measured the ID of the hole on the brake and the bracket, then went to Lowes to snag some bolts.  Brought the bolts home and did a test fit (perfect :D!).  I could get the right wheel connected, but the left wouldn't reach.  As you can see in the top picture, it was pretty far away from the brake actuator deal.  I started looking down the cable to see where it was locked up.  Turns out that potential problem #1 was the demise of the cable.  The cable would move past the janky part where the coating was cut, but that little bit where it was frayed prevented the cable from moving.  Since the cable was rough looking anyway, I didn't feel like it would be safe to try removing the cable and soaking it in rust eliminator to salvage.  For $60 I'll get a new cable and some peace of mind.


Got on Amazon and found the proper cable (thanks to the guys at InfamousNissan).  Removing the busted cable was a pain.  Several bolts were frozen in place, requiring an overnight soak in WD-40 and a set of vice grips to remove.  Needless to say, I was not going to be reusing those bolts.  I put them in a bag so I could get some replacements later.  I also had to remove the skid plate that protects the gas tank.  While doing this I managed to shear one of the bolt heads right off -_-  Alright, so there's something else I get to do... drill out that bolt, perhaps cut the nut off the other side, then get a new bolt and/or nut to replace it.


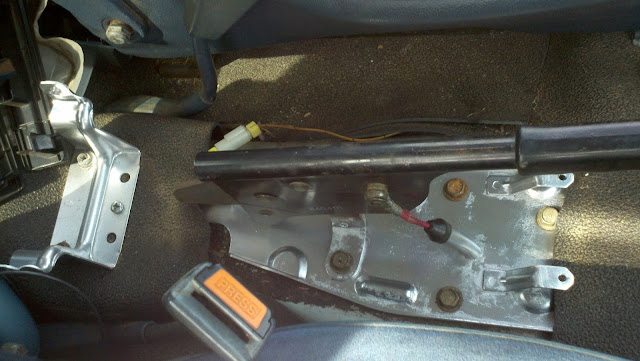
Anyway, Amazon accidentally next day air instead of 2 day, so I got the cable the next day and began the install.  I yanked the old cable as well as the e-brake handle and plate.  I had to use a hammer and chisel to get whatever that hairy crap was off the e-brake handle/plate, then sanded it and sprayed it with some Krylon rust eliminator paint.


I could have done the bolts too, but it's going to be under the console and I wasn't that worried about it.  Looks about 500x better than the atrocity that was under there previously.  While the paint was drying on that (before installing) I went ahead and installed the brake cable.


I used the bolts that I bought for the previous cable and did a successful test fit.  The truck is now stopped on it's own without the assistance of chocks :D


Epic victory.


I actually did the e-brake after yanking the dash (while I was waiting to determine the proper cable to purchase), but wanted to keep this as orderly as I could.  Anyway, lets pull the dash and see what we can see about the air conditioning.


The garage would be the dashboard's home for the next 6 weeks.  It's actually still sitting there right now.  If you notice, basically all the metal behind the dashboard is rusted pretty bad.  While I had everything apart, I figured I might as well fix that.  Evaporust FTW!


That's what I used on the e-brake stuff as well.  It's awesome.


Oh hai nasty rusty metal thing.


Bam, that's what I'm talking about.  Did I mention how awesome Evaporust is?


Soaking the steering column support while paint is drying on a few other pieces.


While doing that I yanked all the AC duct work to thoroughly clean/disinfect (it had a bunch of dirt, hair, and mouse feces in it).  While doing that I found the problem with the air conditioner.  I made this short video to show to the guys at IN to help diagnose.


The problem resided in this piece.


Corn and a mouse dwelling also resided in this piece.


It just so happened that a couple days after getting it down to this point (and removing the corn/cleaning the dirt and whatnot off everything), a guy on IN was selling that whole piece.  I bought the one from him and attached the corn piece from mine (they come apart) to it.  Tested it out and it worked :D


With the newly fixed AC selector thing box in, I started rebuilding the AC duct work.


This post is already pretty long, so I think I'll stop here for the moment.  More to come soon, I've still got a fairly good bit of progress to catch up on before getting to where I'm at now!