Tuesday, October 18, 2016

Bright on the inside dark on the out.

Since the last post there's been a fair bit of work to the old Beast.  Seems like I've spent a lot of time fixing things, so it was nice to get to spend some time making improvements instead of dealing with broken garbage.  The Beast turned 30 in May of this year, so I went out and bought a cookie cake to celebrate.  Me, the Beast, and the Yaris had a little party (I did give some of the cookie cake to my girlfriend but she wasn't in town at the time).  I'll go ahead and warn you, this post is going to be fairly picture-heavy.  I don't think anyone still has dial-up nowadays, but if you're on a limited data plan... just be warned.

30 years, 259k miles, and still going strong!


So to celebrate 30 years of being alive, I decided to give the old truck a few presents.  To start with, I decided it was time to finally get my map lights installed and to do something about that awful, horrible, smoke-stained, stanky-anus headliner.  I used the template David29 gave me with the map lights I bought to cut the headliner.  Then I had to yank the whole headliner out to actually install the mounting bracket, run the wiring, etc.

This was surprisingly difficult, the headliner is really thick

This piece of trim was not going to come off without breaking it :( You can see how nasty that headliner was here too.

After a lot of struggling with it, I ended up having to cut the headliner out.  You can see how absolutely horrifically dirty it was compared to the edges, which were under the trim pieces.

Roof was in really good shape. I decided to put some dynamat-like stuff up here to cut down on rain noise while I had the headliner out.
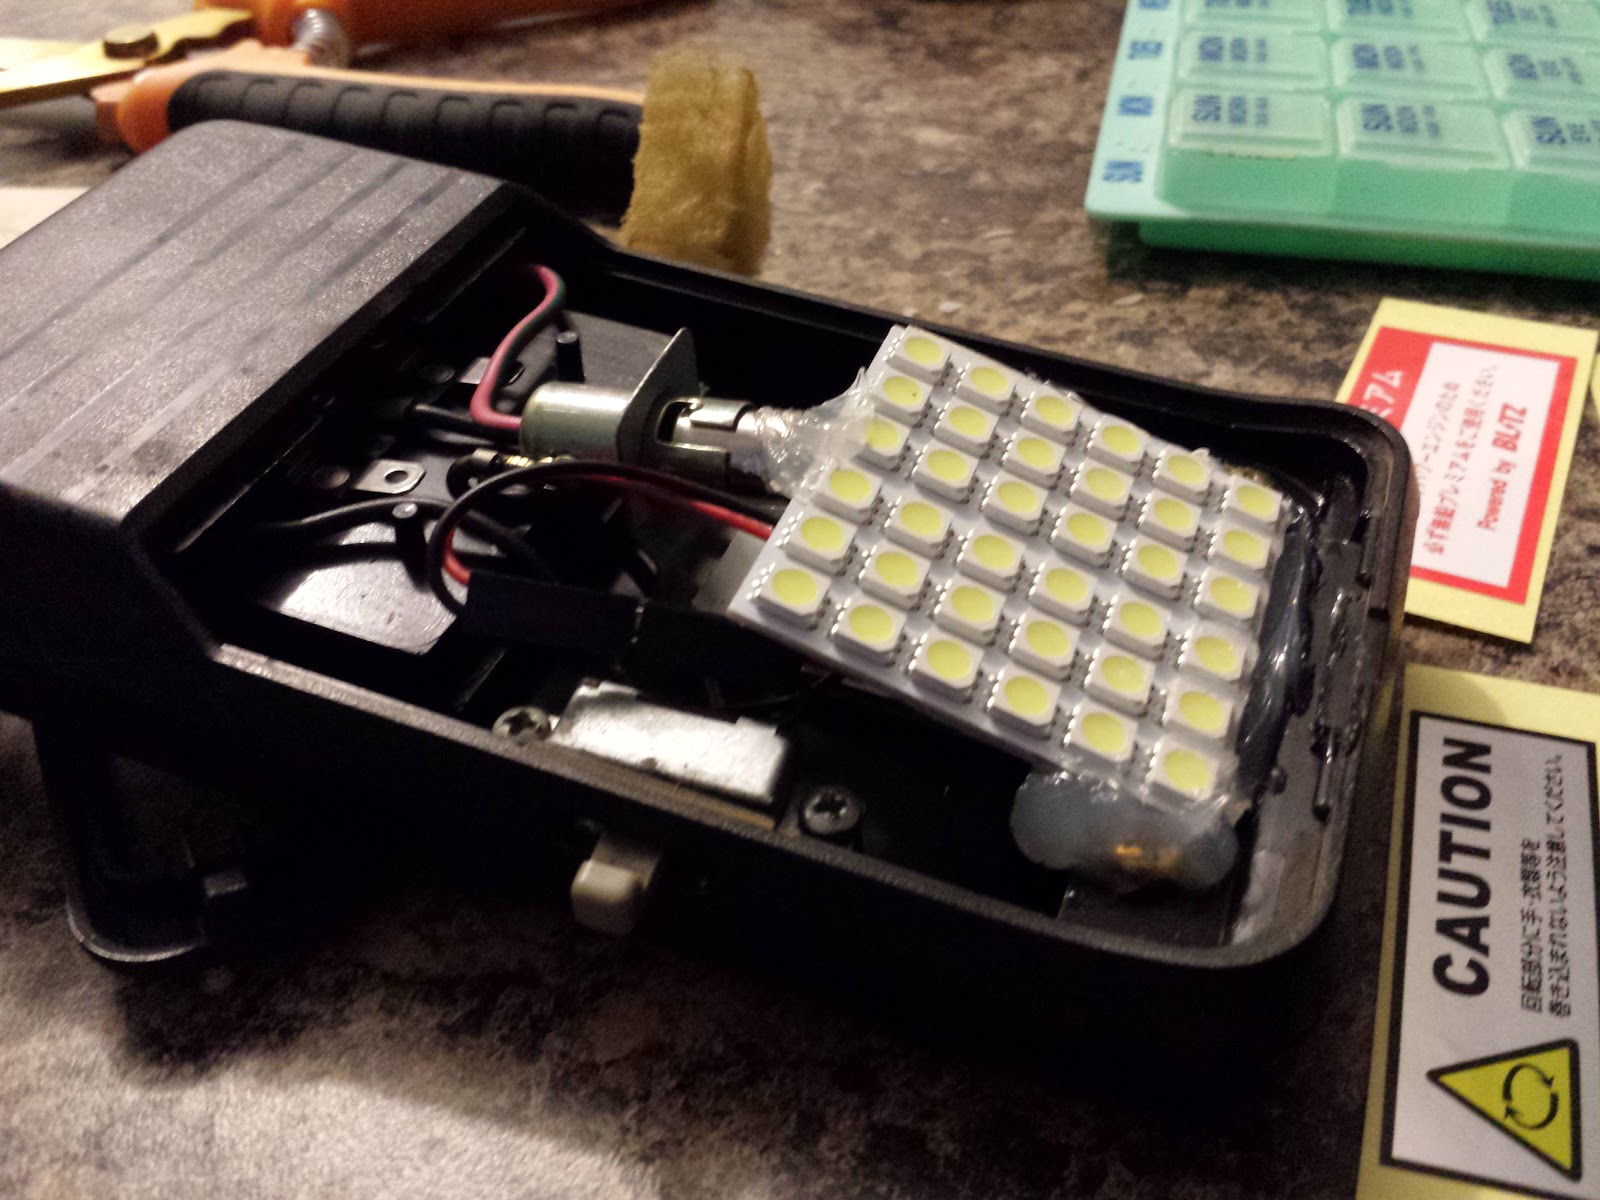
I bought some LED panels to upgrade the map lights and the dome light to LED festoons instead of the old "normal" bulbs.  They original bulbs worked but they were kinda dim and use a lot more energy than LEDs.  With the limited output on this truck's alternator, I'll save every miliamp I can for fun accessories. 


I had to do a fair bit of cutting/modifying to the dome light

Here it is with the LED panel installed.  I put it at an angle so it would kick more light forward into the front of the cab.

It is real bright

Like, real bright. Daytime bright.

Progress with the dynama-like stuff install. 
Converting the dome light was real easy.  Took just a few minutes.  Converting the map lights was a bit more involved.  I don't have pictures of the work in progress unfortunately, as it took a while to find something that worked.  Ultimately I took the map light apart, cut all the original bulb stuff away (including the bulb holder), glued a bottle cap to what used to be the bulb holder area (to raise the LEDs closer to the lenses) and then glued the LEDs to the bottle cap.  I could have sworn I took pictures of it... but I have no idea what happened to them.


So... yeah... they turned out a bit too bright
After retrofitting the dome light, it was time to do something about that nasty headliner.  I was trying to figure out a good way to re-upholster it or something.  I'd tried cleaning it every way the Internet said but that didn't work.  Buying a new one was out of the question, as shipping would be impossibly high and no junkyards around here keep D21s anymore.  Then my girlfriend said "what would happen if you spray painted it?"  I didn't see any harm in trying it, so I did.


The right hand side here is painted, the left hand side is the original dirty nastyness
Holy crap, she is a genius.  It worked beautifully!  I couldn't believe how closely it matched the original color too. 

Here it is all done
Since the headliner was all sorted out, it was time to get this project finished up!  I had to cut holes in the roof around the rear view mirror mounting location, as the 86 trucks were never equipped with map lights and didn't have the recesses for them.  This was so painful...

I had to expand the cuts a couple times to get them big enough.  This was the first go.

Wiring for the map lights and dash cam (future project) installed.
 This was a good time to go ahead and install those lighted Pathfinder visors I've had for a few years.  My passenger visor had broken anyway and just flopped around.  So I went ahead and installed the wiring for the visors while I had this stuff all out.


Headliner back in
 I left the back portion of the headliner out, as I'm going to install a roof-mounted gun rack back there.  I've got the gun rack already, but the install will come later.  I've got other things I want to do first.


Glorious Pathfinder visors.

Crappy cell phone picture, but you can kinda see how closely the spray paint matched the grey of the visors.
 My plastic rear-view mirror mount had been broken before and glued together by a previous owner.  It broke again.  Rather than try to fix that one, I made a new one.  Out of steel.

Let's see you break this, gravity.

Map lights and rear view mirror installed
 I tested everything and it all works :D  It's all running off the dome light circuit, which probably would have been overloaded if I hadn't converted to LEDs.  I did most of the work here from June to September.  In early October, I decided to go ahead and get the truck's windows tinted.  I've been wanting this done for years but just hadn't done it.  The time felt right, so I took it to the shop and got some mad tint.  32% up front (per AL law) and 5% on the rear windows and back glass.

Mmmmm.... limo tint.... delicious!


So, that's how we stand now.  My passenger side door lock has stopped working again, so I'll have to revisit some of my old 2012 posts to find how I fixed that the first time.  This time I'm going to use new parts instead of used ones...  Also, I've got some rock sliders sitting in my parent's garage.  Going to be installing those soon.  Not sure what I'll do after that... but I'm sure something will come to me :)

Thanks for reading!

Monday, April 25, 2016

Few minor issues

It's been almost a year since the last posting to the build log.  Not much has changed since then.  Mostly I've just been enjoying my truck. I had a few more parts to be replaced, so this entry serves more to document time/mileage of replaced parts than anything else.  Truck currently has 258k on it.  I've removed the oil filter relocation kit, as it began leaking in late 2015.  It wasn't a big leak, but with the truck being lifted there's really no need for the relocation kit anymore anyway, so off it went.  In February of this year I had some overheating problems.  I had noticed the truck getting warm but it didn't seem to be a big deal.  Then one day on the way home the temp gauge got just right on the brink of the red during my very short commute from work to home.  I parked up and felt of the upper radiator hose.  It had no pressure on it and there didn't seem to be any coolant in there.  Did some more testing and determined it was the thermostat.  I just replaced the thermostat when I did the big engine rebuild but apparently the cheap aftermarket one just didn't hold up.  I bought a Nissan OEM thermostat from a dealership in New York (via eBay) and installed that.  Wasn't a huge deal to install, but while I was working on it I noticed that my radiator's upper "snout" had broken off.


The radiator that's in the truck is an aftermarket one anyway and it's been in there since I first bought the truck in 2012.  Who knows when it was actually installed, but it was very dirty and probably needed to be replaced anyway.  I got a new one from Amazon for $40 or so.

Old on the left, new on the right
For anyone else running across this, the new radiator had 2 nipples on the bottom of it that the old one did not have.  After discussing it with the guys on Infamous Nissan, they said these were only used on the automatic trucks as some sort of transmission cooler.

The unnecessary nipples
So I'd been noticing this "clunk" noise when shifting gears that sounded like it was coming from underneath the truck for a long time, but didn't think much about it.  I'd asked a few different people and they said that it could be a u-joint or transmission mount being loose or something like that.  I poked around under there a few times but never could find anything wrong.  In March of this year, I noticed that the truck would make a squeaking noise when I first started driving it.  Then it got to where the squeak was every time I accelerated.  I consulted Infamous again and was told that it could be a number of things but to check the u-joints.  Sure enough, the u-joint at the rear differential was bad.


It was a pain to get the driveshaft out.  Those bolts on the flange there (visible in the video thumbnail) were stuck tight.  Even my air powered impact wrench wouldn't remove them.  I ended up getting them off with a 10 amp electric impact wrench.  Ordered a couple Moog 269 super strength non-greasable u-joints from Amazon for $20/ea.  Once the shaft was out I pressed the old u-joints out with my Harbor Freight 12 ton.


rekt
As you can see in the picture above, the old u-joint was pretty trashed.  Both sides of that axis of the u-joint looked like that.  I pressed the new ones in and noticed that they were pretty hard to move.  Did some googling and found people saying that you could whack the ears of the driveshaft with a hammer to relieve some tension.  I did that and the u-joints flopped around with ease.  Put the shaft back in the truck and took er for a spin.  She's running smooth as silk now!

I've also got some more parts for my big electrical system upgrade...


More to come on that later this year hopefully!

Saturday, June 13, 2015

Do you even LIFT?

For the last several months work has been pretty intense and there's just not been much that needed to be done. I just drove the Beast around and enjoyed that it worked for a good while.  I did have a couple more bulbs on the cluster go out, so I decided I'd remedy that permanently.  I bought LEDs to replace all the regular bulbs on the cluster, then swapped them out.  Shortly after doing this I found a good deal on a dimmer switch for the cluster on Infamous Nissan (mine only worked on dimmest or brightest) so I swapped that out as well.  Now I have a fully lit, fully dimmable cluster.  Here it is on the brightest.


Also, during the winter months I enjoyed spending some time with the truck in the snow.  I know we don't get near as much in the south as the folks in the north do, but it was still enough for me to do some 4x4 drifting :)


I've got some electrical upgrades in mind, so I bought some new battery cables from GenuineDealz.com.  I haven't installed these yet, though.  I hope to get to it soon. In the meantime though.... I finally took it to a shop and had the suspension fixed. Also got a 3" lift, a 2" body lift, new 17x10 wheels, and new 33" tires :)

Serious flipping business 2/0 cables

17.5" of clearance from frame to ground

Makes the Yaris look so tiny...
So this is how she sits at the moment :)  I just got it back from the shop today.  Still have some more to do, but the list is definitely shrinking.  Most of the remaining things are just cosmetic or electrical, shouldn't be anything that keeps the truck off the road anyway.

Thanks for reading!

Wednesday, November 19, 2014

Got it running! (sorry for the lack of updates)

Allow me again to apologize for lack of updates.  The last few months have been pretty crazy.  Work's been busy, personal life's been busy, family things have happened, blah blah blah you don't care.

Anyway, when I left off in March I was in the just finishing up rebuilding the motor.  I'll pick up from there.

I cut the rest of the radiator core support out to make finishing up the engine work easier. Plus it needed to be removed anyway.  Tearing things up is fun. I finished up the engine rebuild and hooked all the necessary stuff up so I could test it before putting the core support back in.  The first crank was one of the most exciting things I've ever experienced :)


It was so thrilling seeing the truck fire up again!  I drove it around the yard a little bit just because holy crap it actually works!  My dog wasn't a huge fan of it running open headers, but she lived.

While I had the core support out I took some time to clean up a lot of rust and other garbage where the core support used to be.  I'm sure you can tell, but the clean shiny silver parts are what I cleaned up and painted.  On the driver's side you can see where the huge rust hole was.  I used the good ol' aluminum sheet, liquid nails, and rivets method to patch those holes up to (hopefully) keep it from rusting further.


Since I had the intake off anyway I figured it would be a good time to clean that up and paint it.  It was rusty and just looked like crap.  I used some 000 steel wool to clean up the "Electro-injection" sticker then sanded and painted the intake back to fairly close to what it was originally.  I removed the little vacuum system thing that was supposed to redirect hot air into the motor to warm it faster when it's cold since none of the tubing was there anyway.  One less potential vacuum leak.


I also installed a new A/C compressor, condensor, expansion valve, etc. and had all the rubber hoses rebuilt.


I forgot to put the flipping insulation on this the first time and had to redo it. Fun.
Once I got all that junk back together I painted the core support and installed that.  I read a bunch of conflicting posts online regarding bolting vs welding the core support on.  I have a huge brush guard and all that jazz so I bolted it.  Cry about it.


Since I had all that junk out anyway I went ahead and installed new headlight mounting housing things and an H4 conversion kit I got on ebay for 20 bucks.  It has glass lenses and all and seems to be decent quality.


I also got a new horn for the driver's side.  The truck was supposed to have 2 horns but one of them fell out somewhere before I ever got it due to rust.  I may be missing a few minor things here and there but I'm getting the main bits.  It's been a while...

I got the rest of the AC stuff installed and put the bumper/grille/etc. back on.  I don't know why I didn't take any pictures of that, but whatever.  Actually putting the front together took months just because I was lazy and busy.  I drove it around without a grille and with only 2 bolts holding the front bumper on from March to around August.  Anyway I'm getting ahead of myself, since it was running and in road-worthy condition, I drove it around the yard and around the block and various other places with open headers.  I think I mentioned before that I had to cut the old exhaust out.  I took it to an exhaust shop and had them build me a nice single in-dual out exhaust system.  Looks great when it's cold seeing the exhaust pour out of both pipes nice and even.


I like it :)  Sounds good too.  The truck's got a knock of some sort but it's been going on for like 4,000 miles so apparently it's nothing too important.  One of the lifters ticks too but whatevs.  I drove it for quite a while without issues, then the driver's side brake caliper went out on me.  This is the one that I rebuild rather than replacing back in March of 2012.  This time I didn't mess around.  I went to OReilley and bought the same caliper I have on the other side and replaced the whole thing in the parking lot at my apartment complex, lol.


Got my girlfriend to help me bleed the brakes, put the wheel back on, and the ol' truck's been stopping like a champ ever since.

Here's some pictures of the truck how it sits today.  I also got a new camera, as I'm sure you can tell. Those aren't HDR images, that's just how this Canon S100 rolls.


I've got some electrical issues to work out and some interior work I want to do.  Suspension will be the next big thing...

Thanks for reading!

Friday, May 30, 2014

[OFFTOPIC] How to properly create the certificate for Lync 2013 and Exchange 2013 Unified Messaging Integration

I know this is a truck build log, but the fact that this was published NOFREAKINGWHERE was extremely frustrating to me.  Because of this, ol Beast Build Log is going to have an IT post.

So you've got a Lync 2013 server with Enterprise voice rocking along like a flipping champ. You've got Exchange 2013 throwin' mail around like it ain't no thang.  Shoot yeah, you're a boss.  Flipping need some of that delicious auto attendant and some voicemail though amirite?  You gotta get UM talking to Lync.  The MS documentation for this is a huge wad of mysterious wizardry veiled in vague terminology and poorly-written technet articles, so ignore that flipping junk (I recommend this post for the preliminary UM setup junk.  Even though it's for 2010 it works fine - http://blog.schertz.name/2010/11/lync-and-exchange-um-integration/).  The one thing that seemingly noone flipping documented anywhere is how to form the certificate.  I spent over 400 minutes on the phone with MS with them trying to get the cert to work.  They finally fixed it somehow, but in my 2nd Lync deployment for a customer repeating their steps didn't work.  I have no idea what sort of dark magic they used to make our first deployment work, but I was dead set to figure it out.  Shut up and tell me how to even certificate you say?  PREPARE YOURSELF FOR THE KNOWLEDGE DROP!

Assuming you've got your CA setup on a domain controller or something and all that jazz is working (I'm not even going to get into that), hop on your exchange server and bust open that Exchange Management Shell.  Run the following command with the modifications listed below it:


[PS] C:\Windows\system32>New-ExchangeCertificate -Server EXCHANGESERVER -GenerateRequest -FriendlyName UM-Certificate -PrivateKeyExportable $true -SubjectName "c=US, s=YourState, l=YourCity, o=Company Name, ou=IT, cn=exchangeserver.domain.local" –RequestFile "\\CASERVER\share\Exch_UM_ps.cer"

Substitute EXCHANGESERVER with your exchange server name
Substitute US with your 2 character country name
Substitute YourState/YourCity with your state and city names
Substitute Company Name with your company name
Substitute exchangeserver.domain.local with your exchange server's .local FQDN (exchange2013.mordor.local for instance)
Substitute the \\CASERVER\share\ portion of the final file path with some server that you can dump a cert on. The share will need to allow "Exchange Trusted Subsystem" full permissions.

Once you run the command, browse to that share and open the .cer file with notepad. Copy the big mess of text and browse to your CA's website (http://caserver/certsrv/).
Click "Request a Certificate"
Click "advanced certificate request"
Click "Submit a certificate request by using a base-64" blah blah blah
Paste that big nasty wad of text into the "Saved Request" box
Change Certificate Template to "Web Server"
Click that submit button so flipping hard
Download dat cert
Double click the cert (while still on the exchange server) and click install cert. Bust open your Exchange Admin Center and flipping click Servers on the left side. Go to the Certificates thing at the top. UM-Certificate should show up in there.  Click on that guy and click the pencil looking deal to edit it. Click services on the side like it ain't no thang and place flipping checkmarks beside "Microsoft Exchange Unified Messaging" and "Unified Messaging Call Router". Click save. Close all that jank and open Services, restart Microsoft Exchange UM and Microsoft Exchange UM Call router services.

Now test voicemail and junk. That bzns should be working harder than an ill tempered IT man on a monster-fueled video game binge.

Monday, March 17, 2014

Not done, but here's an update anyway.

So the engine work isn't over yet, but I've got a lot of pictures and stuff and figured I'd throw an update out here since its been a while.  This project has been a mess.  Sourcing parts, returning bad parts, buying hoses 400 times, etc.  It's been a constant battle.

So I cleaned the block with a few razor blades.  It took forever but worked pretty well.  It wasn't hard to tell where the gaskets were busted.  Some rust had accumulated but scraped/cleaned off pretty easily.  I ordered a set of heads from Cylinder Heads International (www.headsonly.com).  While waiting on the heads, I went ahead and installed 2 new motor mounts from Rugged Rocks.  They're pretty awesome and weren't too bad to install.


The heads showed up and seemed great.  One of them worked just fine. I popped the exhaust studs in it and bolted the manifold on, then set it on the block.  The other one though, had obviously had some thread work done on the exhaust manifold side and whoever did it failed miserably.  1 of the stud holes was canted pretty severely and another was just completely in the wrong place.  I had to send that one back and get another.  The next one I got didn't have the valve cover gasket surface prepped and had a jacked up stud stuck in the exhaust manifold side -_-


Notice the stud stuck in the side
I was ill about this but didn't want to risk returning it for a refund because they said they'd give me a random core in return.  I got together with a buddy and we got that stud out without a whole lot of effort.  Got that head on, got some new head bolts and washers, and bolted those bad boys down.

I had been meaning to remove the clutch damper and replace the clutch master and slave cylinders, so one day while I was stuck waiting on some parts to show up I tackled that.  The clutch master cylinder looked awesome.  The fluid was semi-solid.  I have no idea how the clutch worked at all.

Clutch hydraulic fluid is not supposed to be green/black.
I drained the nasty fluid out of the lines and also removed the clutch damper, replacing it with a 10mm metric union.

Clutch damper = thing designed to make your clutch horrible
Doing all this wasn't too bad.  Even the slave cylinder wasn't horrible to replace.  The old one was leaking everywhere, another pretty solid indication that my clutch was working at about 30% of what it should have been.

Prior to me cleaning this area (some) there was hydraulic fluid everywhere
And here's what the new master cylinder looks like.

Complete with nice new clear hydraulic fluid.
The next thing that needed addressing was my radiator core support.  It was in horrible shape and was just always in the way anyway, so I figured I'd yank that while waiting on parts.  It would make reassembly easier anyway.

Note the huge rust hole in the bottom of the driver's side portion
about 2/3 of the core support removed via sawzall and a lot of drilling.
The core support is welded in, so it was pretty aggrivating to get removed.  I ended up stretching that out across a few workdays.  The core support is completely gone now.  There's a nice shiny new painted one sitting in the bed waiting to be reinstalled once the engine work is done.

Once the heads were bolted down and I had everything torqued properly, I wanted to address some bits of the intake manifold that weren't needed.  The EGR didn't work anyway because someone had made some small degree of effort to block it off in about the most stupid way possible.  I removed the EGR completely and blocked it off with an aluminum plate a friend made for me.  I plugged up another hole that went to some sort of little dilly that had a couple of hoses attached to it, but that weren't actually attached to anything.  It was basically the vacuum leak port, I have no idea what it was for.  I figured if the truck ran with it leaking everywhere I'd just plug it with JB Weld, so that's what I did.


So this is pretty much how the truck sits now.  I have a few other minor things put on, but I'm going to hopefully get more work done this week.  I hope to have the timing all sorted and get the engine back together completely in less than 2 weeks.  Hopefully she'll crank for the first time since September this month :)

Sunday, January 5, 2014

Yay cosmetic things! Aww.... Engine failure :|

So last time we left off where I had just finished getting the bed rail installed.  Shortly after the last post I got that finished up, then my grandad took a turn for the worst and passed away.  Here on out, I'm dedicating the truck to him.  I was hoping to get the bed rail painted and whatnot before he passed on (I knew he wouldn't like it in pink) but that didn't happen.  Anyway, between that happening and then me moving, progress got delayed for a bit.  I digress.  I got the sanding done (I didn't sand it down all the way to the metal for the most part, just knocking the surface paint off and roughing it up to allow my primer/paint to adhere better, also to get rid of any rusty spots where the paint had chipped.  Painting the rail in the truck wasn't real fun, but it wasn't terrible either.


Taping bits of magazine and those big black garbage bags all over the truck helped me keep the black paint off the rest of the truck.  After I got the whole thing painted, I got some lights off Amazon.  These are "Tuff LED Light" brand rated at around 1200 lumens.  I wanted two facing forward and 2 facing rearward (to use as reversing lights).  The bed rail already had holes for installing lights, so I yanked all the old wiring the previous owner of the rail left in it and bought some shiny new wiring, again from Amazon.  Amazon is the best place I've found for wiring, switches, etc. just FYI.  I ran the wiring through the bed rail, then through a hole in the bed, along the frame and up to the cab.  There just happened to be an unused grommet under the seat :)  I cut a hole in this and ran the wires (in loom) up through this and through the same channels the rest of the wiring under there used.  It worked out well.


Here you can see the grommet with the wire loom exiting
Wire loom going out of the bed rail and through the bed
The switch beside the power mirror adjustment knob is for the forward facing lights, and the one below the dash dimmer is for the rear facing lights.  I originally wanted them side by side and still would have preferred that, but there just wasn't enough room.


So I finished this a few days after grandaddy's passing and took the truck out for a spin.  I was pretty excited about the lights being on there and was anxious to try them out.  I drove it around a bit and then when night came I headed out to test the lights out.  Man, were they awesome.  I was super impressed with the dispersion and how far the light was cast.  Then I noticed my temperature gauge.  This was late September, so it was still hot during the day, but at night it was nice and cool.  Well, my truck was sitting at the red line.  I knew one of the head gaskets had been gone for a while (I could smell coolant in the exhaust and had to refill the coolant regularly) but it wasn't too bad, as long as it wasn't real hot and I didn't have to stay stopped a long time it was fine.  Well, now apparently both of them had gone and it didn't take long at all for it to get hot.  I drove it around a bit the next day and it got very hot rapidly.  I shut the truck down and parked it for a fair while.
Sometime I also installed this oil filter relocation kit, but I don't remember when, lol.
Months pass...

My car started acting up one day and a whole bunch of other junk.  It was a stressful time with money being short and Christmas coming up.  I was behind on some credit card debt and some other stuff anyway and it was just a bad time.  I was stressed and didn't know what to do.  Borrowing vehicles, paying for rentals, hemorrhaging money like a stab to the jugular.  I decided I'd just reach into savings and pay a shop to rebuild the Beast's engine for me.  I had gathered all the parts over the last few months, but I'd never done this in depth of work on the engine before and was pretty nervous, plus nobody has time for that.  I called a shop and they were like sure bro bring it over here and we'll fix it.  They kept it for a few days, then were like "LOL J/K too many rust" and gave it back to me.  :|  Frustration to the max, yo.  Feels were raging faster than the Ocoee river and I felt like setting the world on fire.  I decided to get after the car again see if I could figure out what was going on.  Previous attempts had failed.  It was misfiring, barely running, throwing a million codes, etc.  I cranked it up that day, and it was like "lol bro I was just joking" and has been working ever since.  I'm glad it's working, but I really wish I knew what the crap happened.

I digress.

Since the shop are a bunch of punks with minuscule testicles, I got after the truck on my own.  Started yankin stuff off this old guy like it weren't no thang.  My buddy that's helped on some other bits of the truck helped here and there, but for the most part I've done a good job of making progress on my own.

That intake manifold was stupid difficult to remove.

Remove things so I can remove things so I can remove things so I can remove things so I can remove things.
Got that nasty leaky piece of trash of a water pump out of there.  It was the 26 year old original water pump.

Heads off
Heard you like gaskets
 Apparently whoever sortof almost tried to fix some things on this engine before was a complete douchetard.  He didn't bother cleaning the gasket surface before when the pump was leaking, just used silicon and a new gasket over the top of the old one.  What a champ.  I got a surface prep kit and an angle air grinder thing and went to town, finally got all that stuff off.  It took forever.  While doing that I got a bunch of degreaser and whatnot and cleaned the front of the engine as best I could.


So flipping shiny amirite?

 You can see in the picture above that there was still a lot of nasty head gasket residue left over.  This, luckily, wasn't as bad as the water pump gasket, so I was able to remove it using the razor blade method that seemed to be favored around automotive forums.  The gasket residue came off easy enough, but the exhaust manifolds were being stubborn.  I had new ones because the whole exhaust system is one large mass of rust, but these have rusted together so hard none of the bolts will move at all.  I'm going to have to just cut the exhaust free, then take it to a shop and get them to build me a new exhaust.  I've got the new heads sitting in the garage and hopefully will have a couple of little gaskets I was missing in in a few days.  Once those arrive and I get the exhaust out, I can start putting stuff back together.  I found so many problems with this truck along the way.... one of the intake pipes had a shotgun bore cleaner brush stuck in it, for crying out loud.  A ton more hoses were cracked, rotten, leaking, or just missing completely.  It's a wonder this thing ever moved.

After I'm done with it, I really hope it runs like a champ, and runs for another 250k+ miles.

In memory of J.M. Burns January 1937 - September 2013